How to Start a Blog (that Makes Money) in 2024

If you are reading this article right now, I will assume that you either you are curious about blogging, or you are looking for an alternate income source because you are tired of your day job.’ Is there any other reason?
Starting a blog isn’t difficult. Maintaining it is!
If you are short on time:
This post tells you how to start a blog using WordPress and then create content. It tells you the marketing tips and monetization ideas that you can use. If you want to know content strategy, marketing, and monetization ideas, you can find them towards the end. I will, however, suggest you read the whole thing!
I created this blog back in 2014 with absolutely no guidance. There were fragments of information on the Internet here and there that I implemented. But over the years, things have evolved.
Earlier, building a blog was quite tricky. Today, you can do that in a jiffy! Blogging today is not as easy as it was back in 2014 or earlier.
Back then, the number of competing blogs were limited. Finding a niche was smooth, and of course, Google’s SEO rules weren’t as strict as they are today.
To this day, even I face numerous challenges that give me sleepless nights. I can very well understand what an aspiring blogger can go through. It can be a nightmare!
So, in this post, I will make an attempt to de-mystify blogging as much as possible and explain things through my personal experiences of 6 years of blogging.
Disclaimer: This whole post is going to be long… very long. So, take your time to absorb all the information you get here. For your benefit, I have divided the whole post into broad chapters. Six chapters to be precise!
Let us begin…
Chapter 1: The Basic Questions You Need to Ask
Before you jump straight into blogging, you need to ask these questions and answer them one by one:
- What is blogging?
- Who can create a blog?
- Why do you want to start a blog?
- What do you want to blog about?
If you don’t answer these 4 questions, you will make a mistake that you may repent later. So, let us begin answering the questions one by one.
What is blogging?
Short and simple – it is an online journal.
What type of journal?
It can be anything. Your personal experiences, your ideas, and views, information about a particular thing or a set of things, about animals, about cars… just about anything you can think of.
You can be the only person writing on the blog, or there can be multiple writers writing on the blog.
All the information that you publish on the blog is displayed in reverse chronological order. This means that your latest post will always appear first.
Blogging comes with a set of purposes. All of those purposes can be relevant to you, or only a few of those purposes can be relevant to you.
Here is a quick list of purposes:
Record keeping
It is a multi-faceted thing. You can keep records of just about anything like your memories or your projects or your college notes and more. Today’s blogs are immensely powerful. They can not only allow you to store texts, but also allow you to store PDF files, images, videos, and just about anything digital. It is about the technology used in the backend.
Connecting to like-minded people
You can create a blog about your hobby. People with a similar hobby can look for information on your blog. You can engage in discussions and share valuable information.
Selling something
You may be great at writing poetry or maybe essays.
You may be great at painting or photography. You can sell these things through your blog.
Albeit, you will need to set up an online store. Still, without a blog, that store will be lost in oblivion unless you have the money power to directly promote that store through various mediums like television, search engine ads, newspaper ads, and more.
A blog can help you to acquire the attention of your target audience, and then, you can channel them to your store, and sell your products to them.
Making money with information
Take a good look at this blog, yes, the one that you are reading now. It doesn’t sell anything (you may see a few affiliate links).
This blog focuses on providing information only.
The method of earning money for this blog is simple! ‘Monetize the information.’
Monetization happens in multiple ways. There is a possibility that this blog goes for “advertisements.” You can do the same through other methods like affiliate links and affiliate marketing, sponsored content, etc. You can also use all the methods together.
How you deploy the different monetization methods is a topic that I will cover in the last chapter.
Now, the question is – ‘what is your purpose of blogging?’
You need to decide your purpose. It is this purpose that will define “how you blog,” “on what you blog,” and the things you need to do to fulfill your purpose.
As far as this blogging 101 guide is concerned, I will focus on the last purpose, that is, making money.
Who can create a blog?
Anyone!
Yes, anyone can create a blog. You don’t need to have any special degree or qualification. You don’t need to be of a certain age. You don’t need to have a certain financial status.
Any Tom, Dick or Harry can create a blog provided:
- The person has money for acquiring the basic resources.
- The person has a purpose in mind.
- The person has the tenacity to continue blogging.
About tenacity, you need to know that blogging is not a one-time thing. It has to be continuous. It is not necessary that you need to write blog posts every day, but yes, you need to do so at regular intervals.
And…
You should keep doing this for a very long time.
In short, you need to have a passion for blogging.
Talking of passion, we reach the third question.
Why do you want to start a blog?
From my personal experience, don’t start a blog simply because you want to earn money. There are many other ways you can do so. Some of them can be way easier than blogging.
I have an existing blog with a good reputation as of today. It goes by the name Facts Legend.
Do you know that Facts Legend is not the first blog I created? Here is a list of blogs that I created before starting Facts Legend (and they all failed):
- NascentArray.com (2008)
- Crystalgoblin.com (2008)
- Binaryoptionsinfo.net (2009)
- Fungag.com (2012)
Nothing, literally nothing worked.
The reason was that I focused on making money, and in an attempt to do so, I selected wrong niches, I tried to include anything and everything under the sky in those blogs and whatnot.
Today I look back and laugh at my pathetic decisions.
But, the core reason for the failure of those blogs is, I did not have a passion for any. I used to write on anything and everything from news to beauty tips to concept technologies and just about anything that I thought was good.
I was wrong.
I was wrong because I did not have a passion for writing those things.
I was wrong because I thought of making money only.
I was wrong because I thought that blogging was all about me.
I was wrong because I did not give importance to those who wanted to read my blog.
You don’t want to repeat my mistakes!
So, why do you want to start a blog?
If you don’t have a product to sell, and you still want to make money out of blogging, you need to have a passion for a particular subject.
That subject can be a very pinpointed one or just a specific broad category.
For example, you may be very passionate about say, ‘baking cakes.’ This is a very pinpointed topic and attracts only those people who love baking cakes.
Or,
You can select a broad topic like ‘cooking.’ Cooking is a broad topic. You can cook a lot of things. If you are passionate about cooking as a whole, if you like to cook new recipes, you can focus your blog on cooking in general.
Take, for example, my blog. It deals with facts and education.
The two go hand in hand! Facts are a subset of education as a whole, and I am passionate about education.
So, after years of failure in blogging, I eventually understood what I like to write about, and today, that passion stands in front of you in the form of Facts Legend.
Today, it is a mix of both – passion and intention of making money.
Bottom line?
You need to combine both or else, you will not succeed.
What do you want to blog about?
I already covered a part of it in our third question above. I will just elaborate on it.
You see, one of the blogging mistakes that many new bloggers make is that of not selecting a niche properly.
I made the same mistake.
But you don’t have to make that mistake.
You need to decide what you want to blog about.
To decide that, you need to first figure out what you are passionate about. Here is what you need to do find out your niche:
Sit and think
You visit a lot of websites and blogs. What type of content do you consume the most simply because you love reading about it? Don’t tell me that you love consuming memes.
Well, even I do that but, memes are for entertainment. They don’t have any added value apart from making you light after a hectic day at your college or office.
It can be space-related articles you read the most. Or perhaps, a cooking website from where you learn new recipes.
The point is, you need to find out a subject that you are passionate about. It is going to take some time. Invest that time.
Take notes
There may be multiple topics or subjects you prefer reading about. It is quite easy to confuse them as your passion.
Keep a good old-fashioned pen and paper, and take notes. Write down all the topics/subjects you find interesting.
Ones you have list ready, go through it and give each of the items a ranking. Redo the ranking process if necessary.
Highlight the top three or top four.
Once you get the top list, redo the process! Think and figure out the topic that you love most, and you understand the best. Try to pinpoint on one topic only!
That should be your topic.
Should you work with that topic?
Now the question is, “Do people search for that topic?”
And…
It is a very logical question! If the topic you like is something that people don’t read or search for on the Internet, there is no point taking that as a blogging topic.
You can then settle for the next best topic you prefer, and find out whether people search for that or not!
How do you know whether people are looking for that topic or not?
You can find that out with relative ease! All you have to do is use the free Ubersuggest tool, key in the topic you chose and hit the search button.
For instance, I used the search term “baking cakes,” and this is what Ubersuggest returns with:
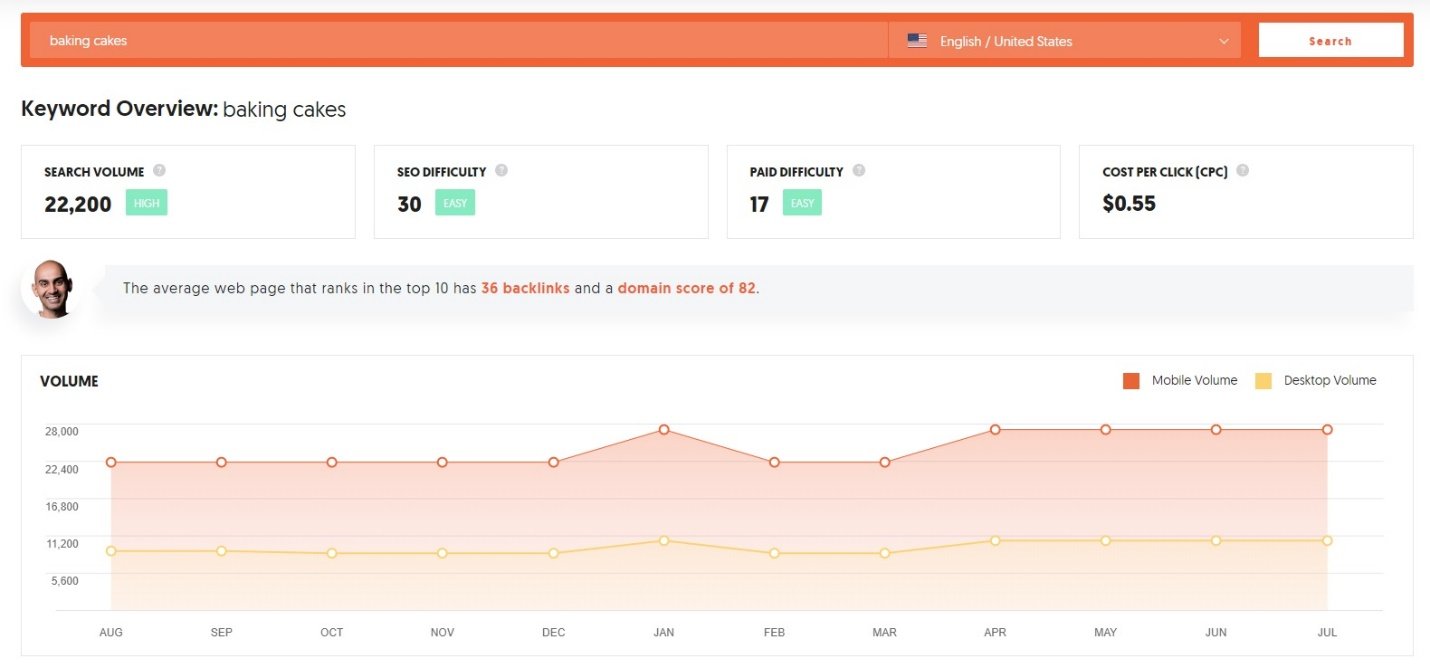
Look at the search volume. Monthly, 22,200 people search for this topic! It is something you can work with.
You can find the search volume of the topic you choose. Ubersuggest is an incredibly famous tool that can help you with you the SEO tricks later when you start a blog successfully.
Once you find the topic, it is time to start your blog!
Chapter 2: Starting a Blog
Once you know what you want to blog about, it is time that you start a blog. But where do you start? Before I start telling you the steps, I will like to clarify that I am writing this for WordPress blogs. I am not focused on Blogger, Wix, etc.
Even in WordPress, I am focused on WordPress.org and not WordPress.com.
The reason is simple! WordPress.com, Blogger, Wix, etc. are all free platforms that are significantly crippled in terms of functionality and customization.
I don’t like such limitations. If you want to explore them, there are hundreds of online resources explaining how to get started with those platforms.
Not going by my choice, the more logical answer is that WordPress powers 1/3rd of the websites and blogs all over the world. It is flexible, it is extremely customizable, and it is free.
There are thousands of themes and plugins (covered later) that will allow you to create a blog that you and your readers will love.
Again…
This is all about WordPress blogs.
Getting back to the topic…
You will need a few things to start with. What are those? Here is the list:
- A domain name.
- A hosting provider who can give you a server.
- Blogging software.
The domain name
What is a domain name?
It is the name of your website. It is also the address of your website on the vast Internet of Things.
Without a domain name, you cannot build a blog.
You need to buy this name.
It is not a one-time purchase. You have to keep paying for it every year. Alternatively, you can buy it for 10 years, if you want. You can pay for the name once every ten years.
But why do you need a domain name?
Let me answer it this way:
Suppose you live somewhere in California. I want to visit your home for a coffee. Where in California should I go? San Jose? San Francisco? San Diego? Sacramento? Fresno? Bakersfield?
Where am I supposed to go?
Let me assume you are in San Jose. I go there. Now what? Which house?
That is exactly how your blog works.
If you are writing a blog, it needs to have an address that people can use to locate your blog on the Internet.
Choose a unique name
When you start a blog, you need to give your blog a unique name, and it must reflect the overall topic of your blog.
For example, if you are doing a blog on baking cakes, you can select a name such as “ibakecakes.com.”
So, if I visit this blog, I will know that it is all about baking cakes.
Trust me, there is no hard and fast rule that your blog name should reflect the overall content theme of your blog. However, it is better!
Why is it better?
Imagine what happens when you use the name “ilovecars.com” for the cake baking website! I, as a visitor, will think of it as a blog on cars. If I love cars, I will visit your blog only to find cakes everywhere!
Will I ever return to your blog? I won’t!
That’s the reason why your blog should have a name that nicely reflects the overall content theme.
The domain extension
What should be the extension of your website’s or blog’s domain name? Should it be ‘.com,’ ‘.org,’ ‘.net,’ or something else?
It really doesn’t matter what extension you select. But be sensible.
There are hundreds and thousands of extensions to select from. There are some that you cannot use. For instance, you cannot use .edu and .gov. They are reserved for educational institutes and government, respectively. Similarly, you cannot use .mil because it is reserved for the U.S. military.
Again, if you want readers from across the world to read your blog, you shouldn’t use something like .au, or .in, or .us, or such extensions. They will tie your blog’s identity to a specific country.
For instance, .au will mean that your blog is meant primarily for Australians. When you use .in, it will primarily target Indians, while .us will give your blog an American identity.
If I am from, say, Egypt, and I see a blog with .us or .au extension, I may not visit. It only creates a psychological barrier for international visitors.
So, I will suggest you go for something more generic and something that is widely used. For instance, .com is a great choice to start with. If you can’t find a .com domain, you can settle for “.org,” “.net,” “.blog,” “.online,” “.ooo,” etc.
How to buy a domain name?
You can buy a domain name from companies that go by the name domain name registrars. Many of them are hosting providers as well (more on this later).
Here are a few examples:
- Bigrock.com
- Namecheap.com
- Name.com
- GoDaddy.com
- Domain.com
- Bluehost.com
- Dreamhost.com
- Hostgator.com
- Shopify.com
- Buydomains.com
There are many domain registrars across the world. Not everyone has the license to sell every type of domain extension. So, you can check out a few and see whether they are offering the domain extension you are looking for, or not.
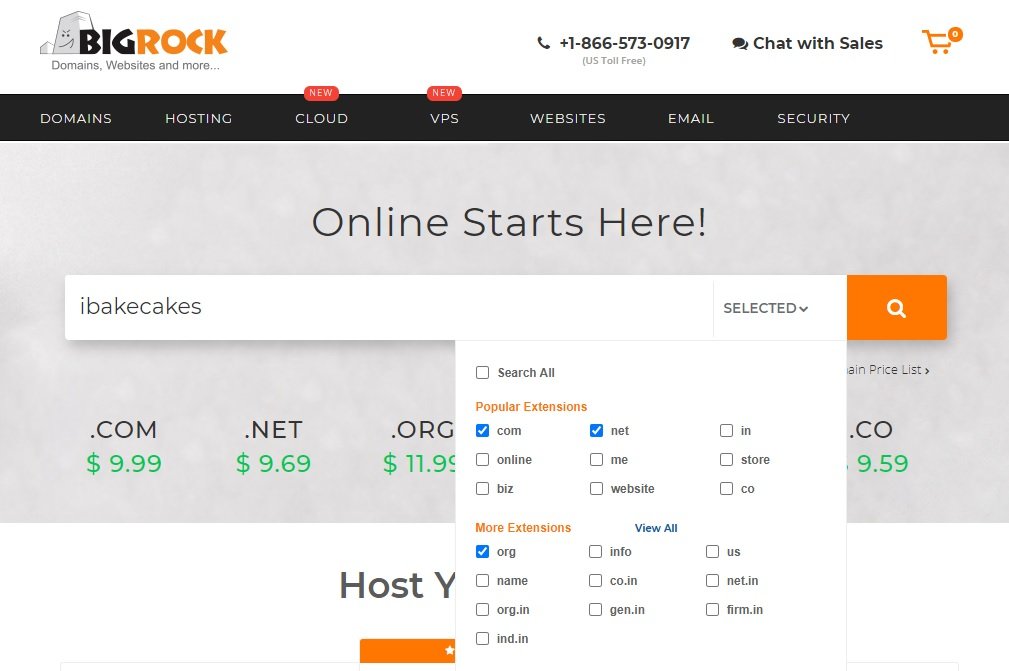
I usually recommend Bigrock for domain registration, because they have a wide range of domain extensions to offer. However, the ones that I have listed here are all great options.
Here is what it looks like if you try to buy a domain from Bigrock:
The hosting (server)
What on Earth is this?
In the context of the example of the coffee invitation I spoke about earlier, it is the home or the building against the address where you live.
Suppose you give me an address that reads House No. 24, Bakersfield, California. I take my car, turn on the GPS, and merrily drive to that address, thinking of enjoying a nice coffee with you, and later, munch a few carrots!
When I reach the GPS location, I find nothing there! No house!
What now? I will go to Starbucks, buy a coffee, and drink it without you!
So, an address needs a house or a building!
Similarly, if your website has an address, it should have a place to live. The house where your website will live is called the server.
What is a server? It is basically a computer with a large amount of storage space (magnetic hard drives or SSDs). Your website will be located in one of the storage units.
So, the server is the house for your blog. Anyone who comes to visit your blog will have to reach that house.
Where do you buy this house from?
There are many providers. They go by the name “web hosting companies.”
Many of them are both domain registrars and hosting providers. Some of the top web hosting companies are:
- Bluehost
- Dreamhost
- GoDaddy
- BigRock
- Cloudways
- Hostgator
- WPEngine
- Vertical Computers
- Digital Ocean
And more…
The list can literally go on and on. There are literally thousands of web hosting companies spread across the world. No one can list all of them in a single place.
You can select any one of them. But before you select, there is one big problem that you need to solve.
What is that?
The problem is – ‘What Type of Hosting Should You Select?’
Trust me, this is the worst part!
Why do you ask?
Because…
There are different types of hosting, and each hosting type has different plans. The sheer number of varieties you will get will bog you down!
Cherry-on-the-top, each hosting plan will have different offers. Each of those offers will look too tempting.
All of these will make your life incredibly difficult.
Just to give you a glimpse, here is the complete list of the different types of hosting you can get:
- Shared hosting
- WordPress hosting
- VPS hosting
- Dedicated hosting
- CMS hosting
- e-Commerce hosting
- Cloud hosting
Each hosting type has different features, different operating systems, different email solutions, and more!
Already confused?
Don’t be! Since you are starting out your blogging journey, you should go for shared hosting or WordPress hosting. You can later upgrade to more powerful VPS hosting, dedicated hosting, or cloud hosting.
Such upgrades come way later when your blog grows, and you start getting significant amounts of visitors that shared hosting cannot handle.
If you want to know which are the best shared hosting providers, I have a nice article comparing the top 5 shared hosting providers. You can read it here. As a bonus, you get to know the differences between the hosting types along with their benefits and disadvantages.
So, which one to select?
I will suggest you go to Bluehost.
WordPress developers officially recommend this host, and my test results also validate the point that Bluehost is by far the best option for WordPress.
If you are opting for Bluehost’s shared or WordPress hosting plan, you don’t even have to purchase the domain name separately. They will offer a free domain for 1 year. You need to pay for it from the second year.
As of now, I will suggest you go for the basic plan.
Why?
Because when you are starting with a blog, you will have no visitors, and you will have very little content. It will be pointless to buy something that you don’t need now.
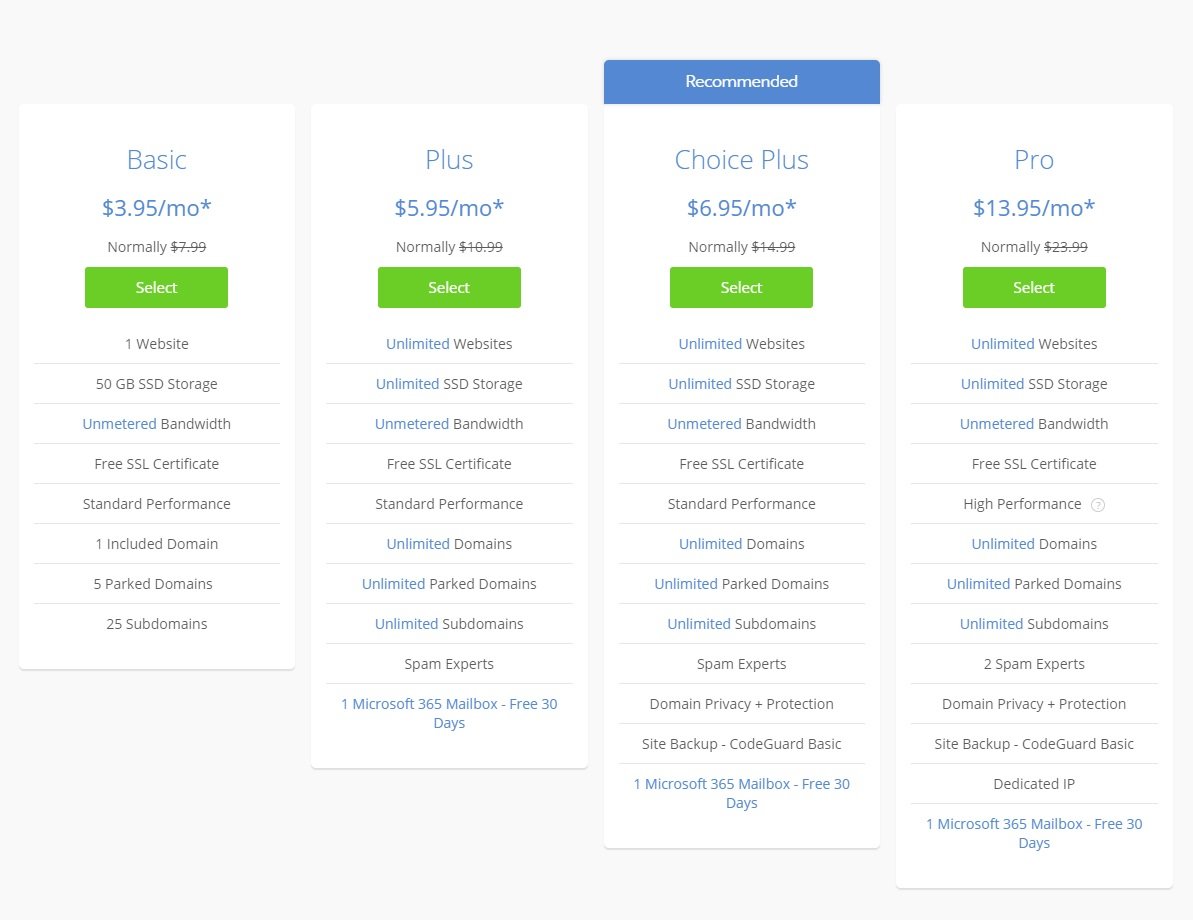
In case you are opting for simple shared hosting, this is what you will see on the Bluehost page:
If you are going for the WordPress hosting with Bluehost, this is what you will see:
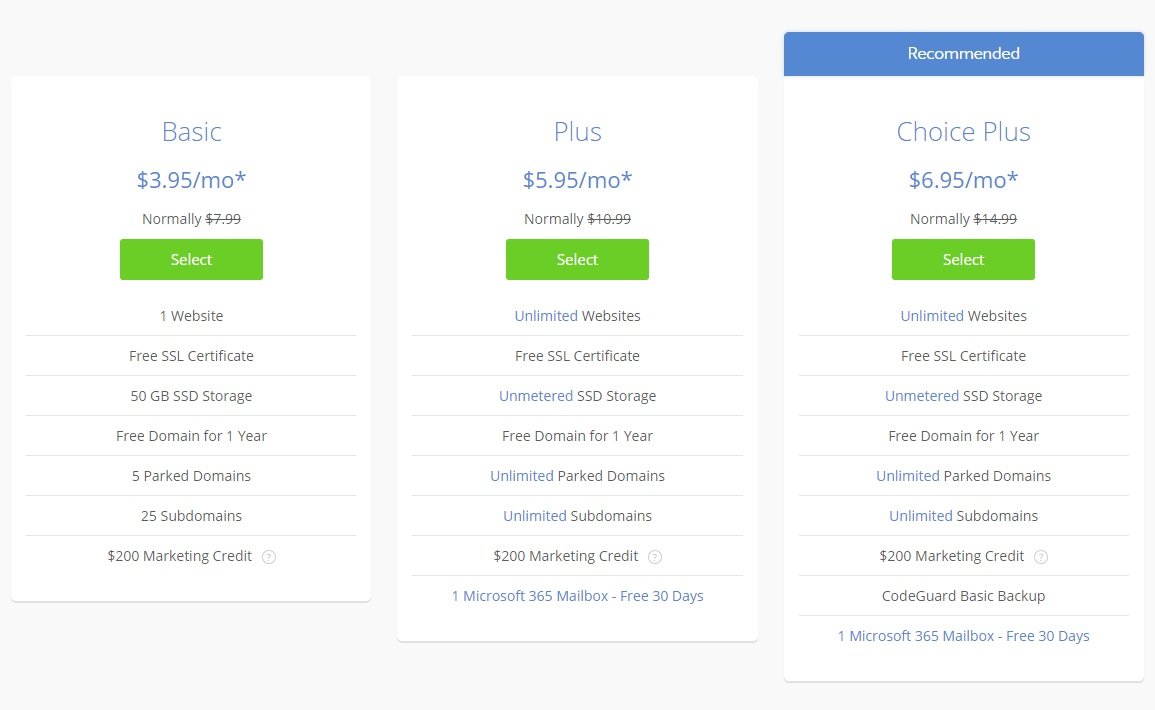
I will suggest you go for the WordPress hosting because once you buy a WordPress hosting, Bluehost will automatically install WordPress on your domain.
Once you select a plan, you will go to the next page where you can register a domain or add an existing domain. This is what you will see:

Either create a new domain or use an existing domain. You can also skip it if you want to create the domain later.
Whatever you select, you will reach the next page where you will have to create an account and pay!
This is what you will see:
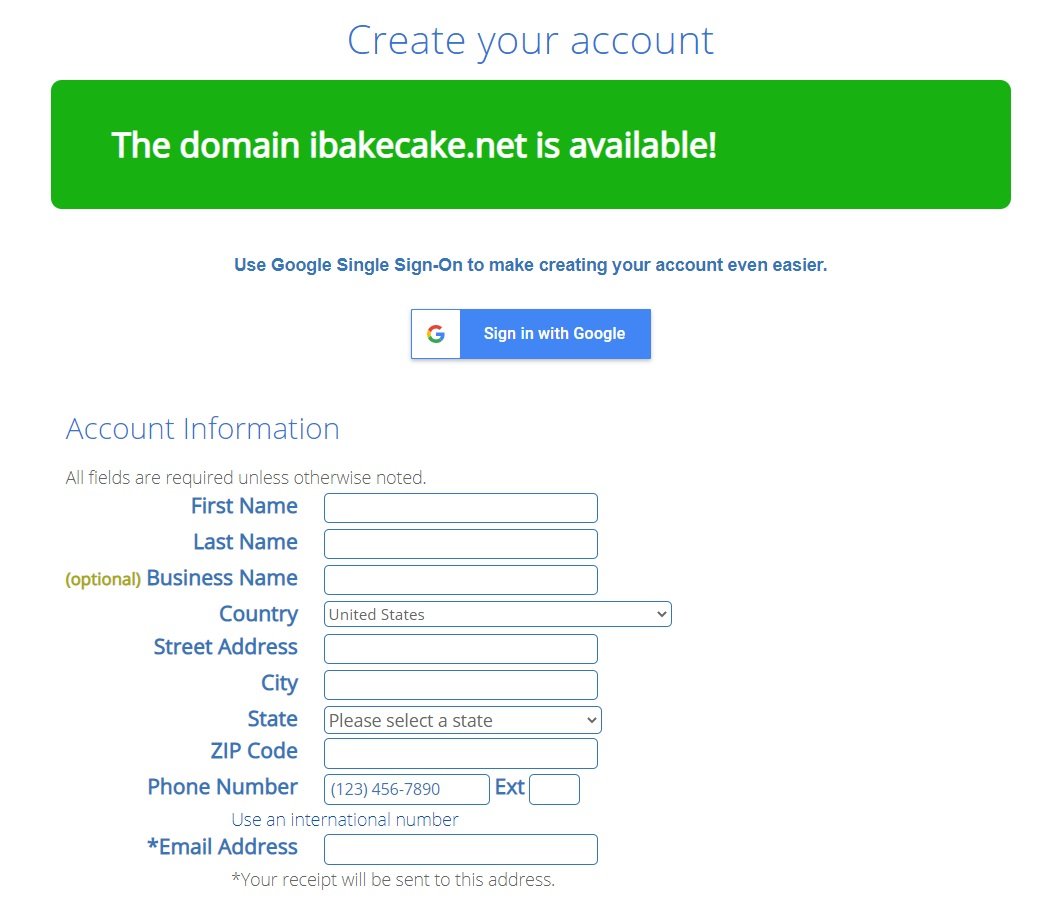
You will also need to select the package you want. You can do that on the same account creation page. This is what you will see:
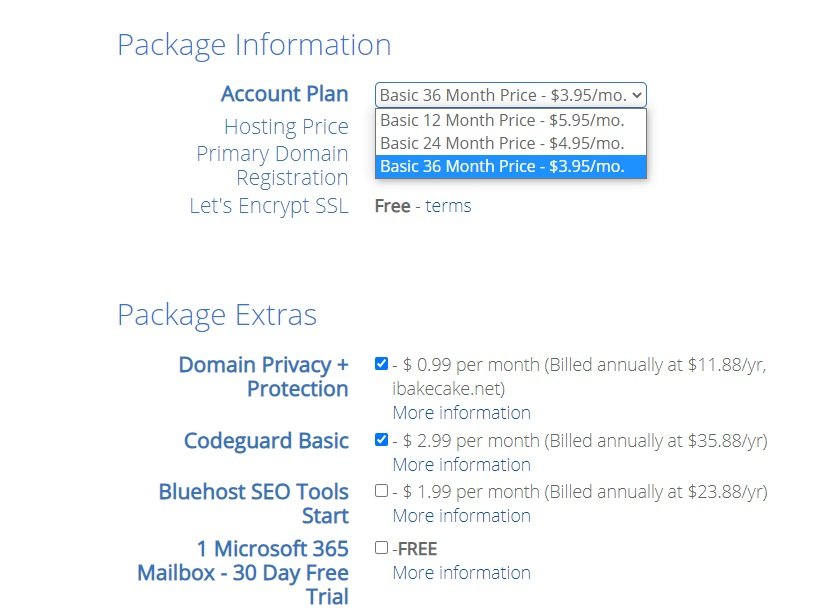
Note that you will have to buy a package for a minimum of 1 year. You may choose a 2-year or a 3-year package. You will get the lowest price only if you decide to take the 3-year package.
What about the package extras? My suggestion will be to keep the Domain Privacy and Codeguard Basic.
Finally, when you are done selecting the package, you need to pay. This is what the payment segment looks like:

If you don’t want Bluehost, I will suggest you settle for the next best options. They are GreenGeeks and DreamHost.
Setup your blog
Once you pay, Bluehost will ask you to go ahead and create a password. This is what you will see:
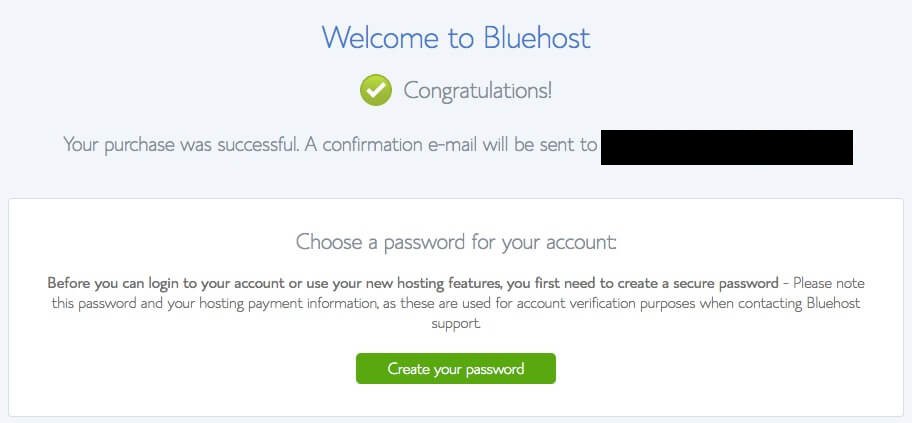
Clicking on the green button will take you to a page where you can create a new password for your account. It will look like this:
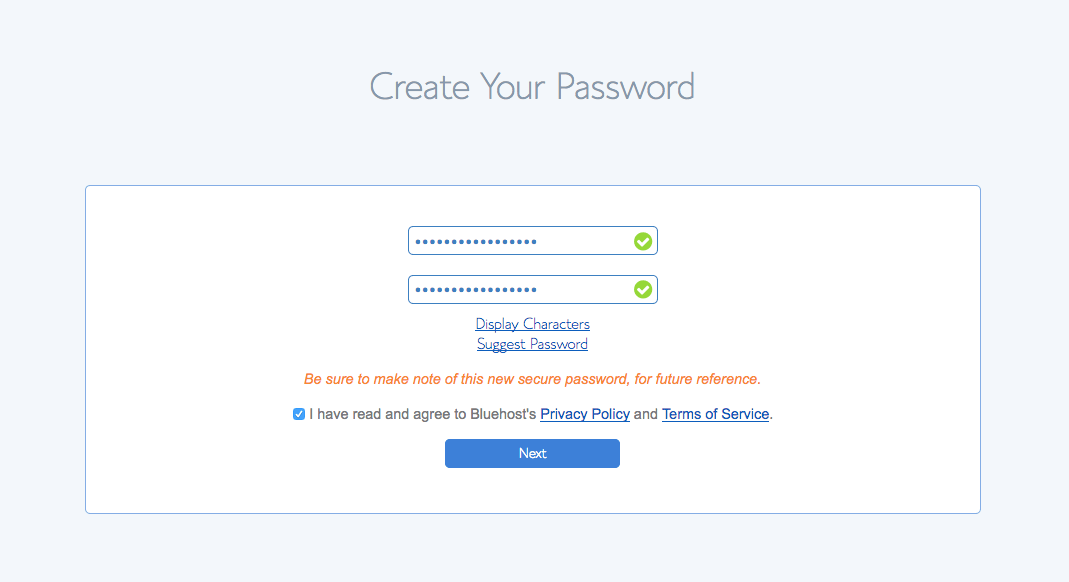
After you create your password, Bluehost will create your account. After that, you will be asked to select a theme. You can go ahead and select any free theme from the list that you see, or you can skip that step.
Even if you are selecting a theme now, you can change it later. If you choose not to select a theme, that’s fine as well. You can do that later.
This is how the theme selection screen looks like:
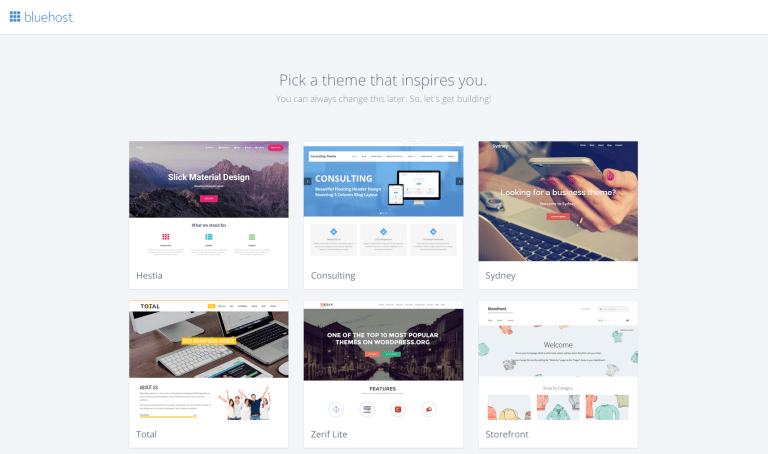
Whether or not you select a theme, the next screen that you see is this:

Once you click on “Start Building,” Bluehost will install WordPress on your hosting account. After Bluehost finishes the installation, this is what you will see:

Click on Personal because you are about to start a blog. You are not building a website for a company. Once you click on Personal, this is what you will see next:
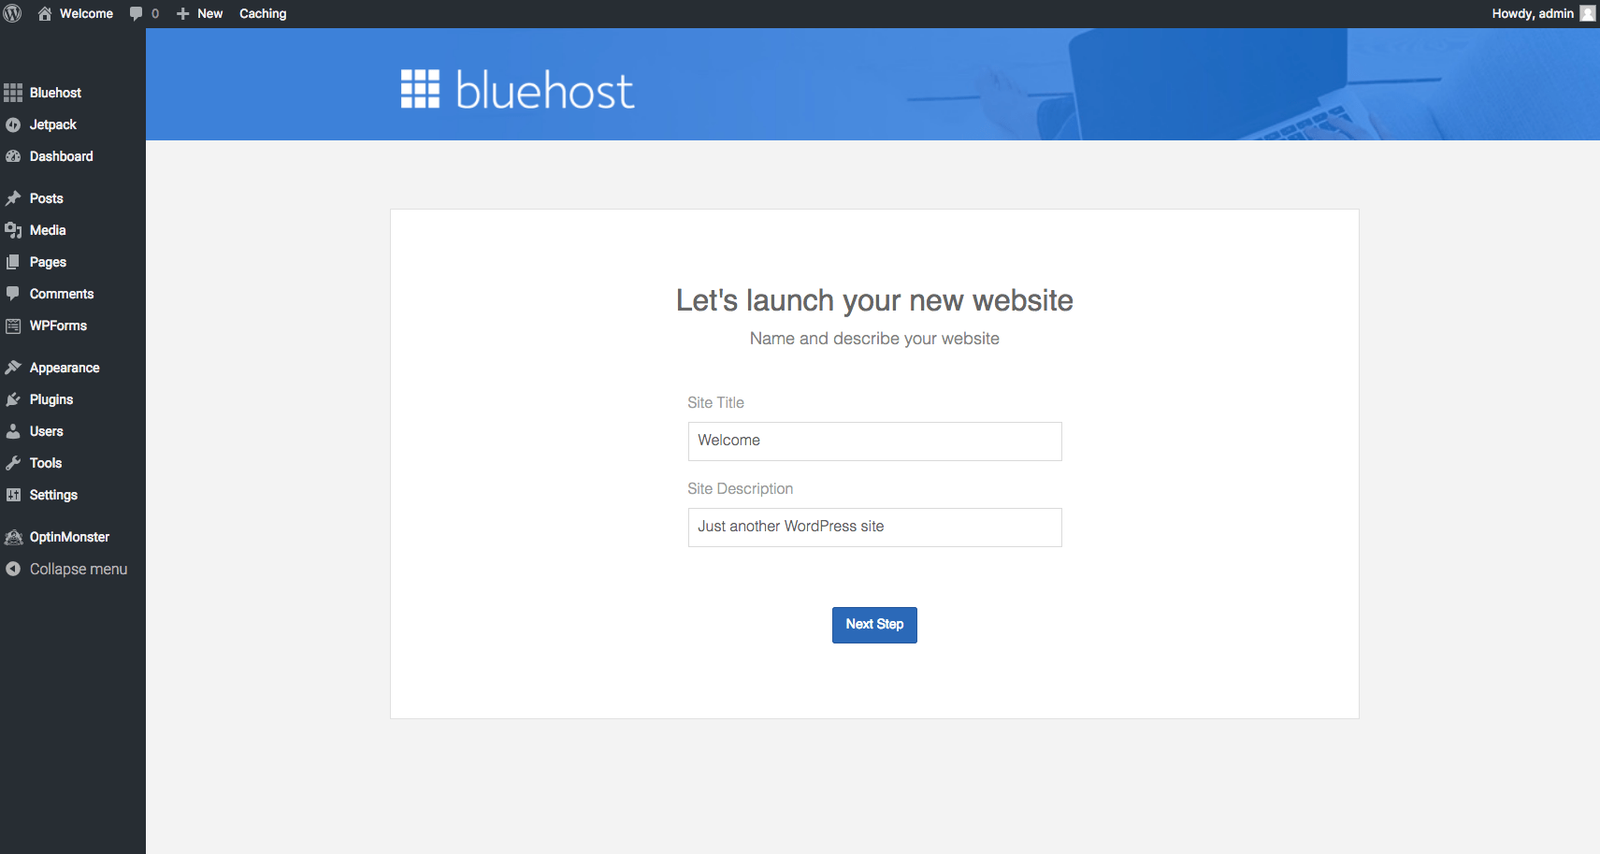
Yes, you did it! Your blog is almost ready to launch. This is where you need to give your blog a Title, which is basically the name of your blog.
Give a site description as well. A description can be creative.
If I take the example of ibakecakes.com (or .net as you can see in one of the screenshots above), you can use the following:
- Site Title: I Bake Cakes
- Site Description: DIY Cake Expert
Once you provide the title and the description, click on Next Step, and follow the screen prompts until you see this:
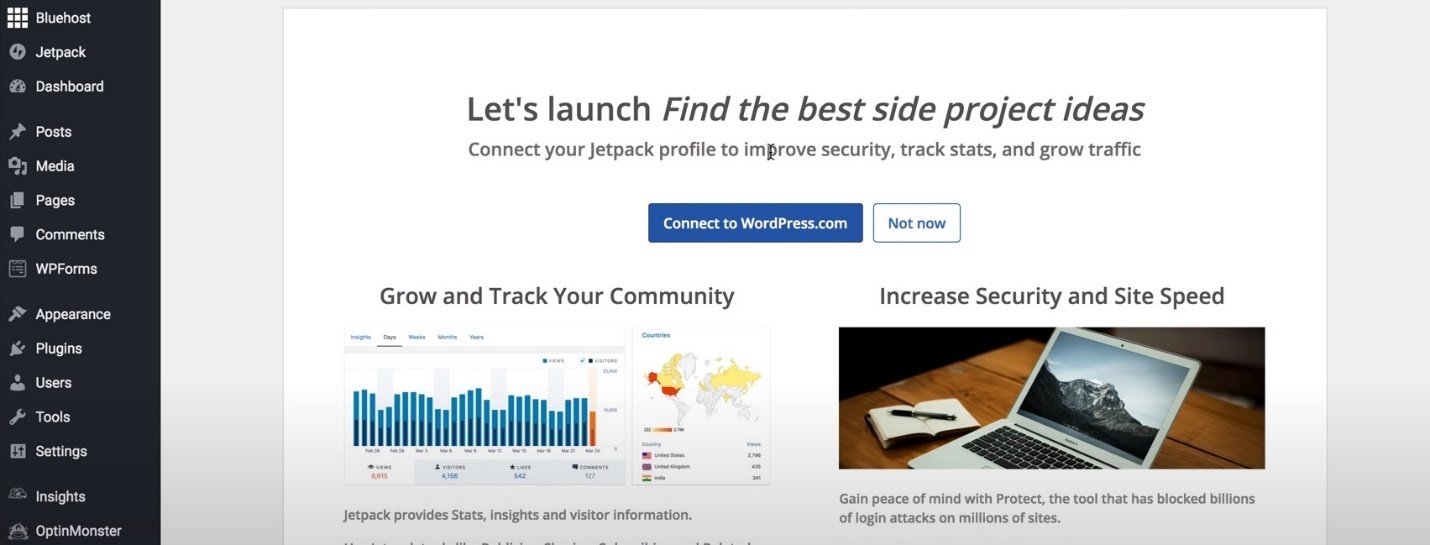
Click on the “Not now.”
Some people advocate Jetpack, and some don’t. I am of the latter category. I never liked the Jetpack.
You may, however, choose to connect with WordPress.com and Jetpack. If you decide to do so, you will need to create an account on WordPress.com.
Once you click on “Not now,” you will see this page:

You can move ahead and click on the “Customize your site” button.
That’s it! You can now go ahead and customize your website the way you want.
Before you start doing so, click around and take a good look. You are in the admin area of your WordPress blog.
All great things will happen from here.
You need to make sure that you are familiar with this area.
Why?
Because you, as a blog owner, will spend most of your time here. This is where you will be creating blog posts, uploading images, changing themes, uploading or installing plugins, etc.
Site design
Since you are just starting out, I will not recommend you to go for a premium theme now. There are dozens of sources from where you can purchase premium WordPress themes with advanced functionalities.
For instance, you can always head over to the Envato marketplace, where you can purchase premium themes and plugins for your blog.
My question to you is, “Why would you do that? What is the justification for such expenses?”
You are just starting your blog. There are no posts. You don’t have any visitors now. Investing in themes doesn’t make sense.
Once you create a few blog posts, and you start getting a sizeable amount of traffic, you can justify your premium purchases. Until then, stick to a free theme and focus on what is most important – the content.
There are dozens of free themes out there that can give your blog a pleasing appearance.
There is yet another reason that I can think of why you should not be using a premium theme now.
Remember, it is your first blogging experience. You need to keep it as simple and pleasant as possible.
Premium themes come with too many functions that can confuse you, and customization can become a difficult task.
Advanced premium themes are perfect for an experienced user. They can easily navigate their way around and figure out what is necessary and what is not! For you, it will be different. Everything will look important.
Honestly, you don’t need to use all the features and functions that a premium theme provides.
If you are still hell-bent on fiddling around with too many options, you can try out the Hueman theme. It has both free and premium versions available.
The number of features you can get in it is comparable to many premium themes out there.
Why is design so important?
Why am I talking so much about themes?
That’s because the design is important, and it plays a vital role. Whether you like it or not, the truth is that the behavior of your blog readers will dramatically depend on the overall layout of your blog.
Did you know, the University of Basel and Google together conducted a study in 2012?
They found website users take 1/20th to 1/50th of a second to perceive the functionality and aesthetic beauty of any website!
What’s so big about that research?
You may, or you may not have heard about what is called the Halo Effect. It is the psychological effect that comes into play when users first visit your website.
What they perceive about your website in that fraction of a second becomes a judgment that they will happily extend to every aspect of your blog!
So, if the design of your blog is not right, they will immediately consider that the content of your blog is not worth reading. When they think like that, they will leave your blog and never return.
Is that what you want?
Your blog’s design will determine whether they will return or not. It also develops trust.
A good design will tell your potential readers that you care about your blog, which is why you have spent hours creating an aesthetically pleasing blog.
This is where they will extend their judgment and think that if you care about your blog’s design, you also care about the content quality.
This trust is what makes them come back and stay on your blog for a longer time.
When I say good design, I really don’t point to horrible flashy animations, weird-looking fonts, and a busy-looking interface.
A good design should be clean and easily navigable. Your readers should be able to read the content with the least distraction.
You can select free themes like Astra, which has a clean design. If you want, you can later upgrade to its premium version.
How to add a new theme?
Adding a new theme to your WordPress blog is not difficult.
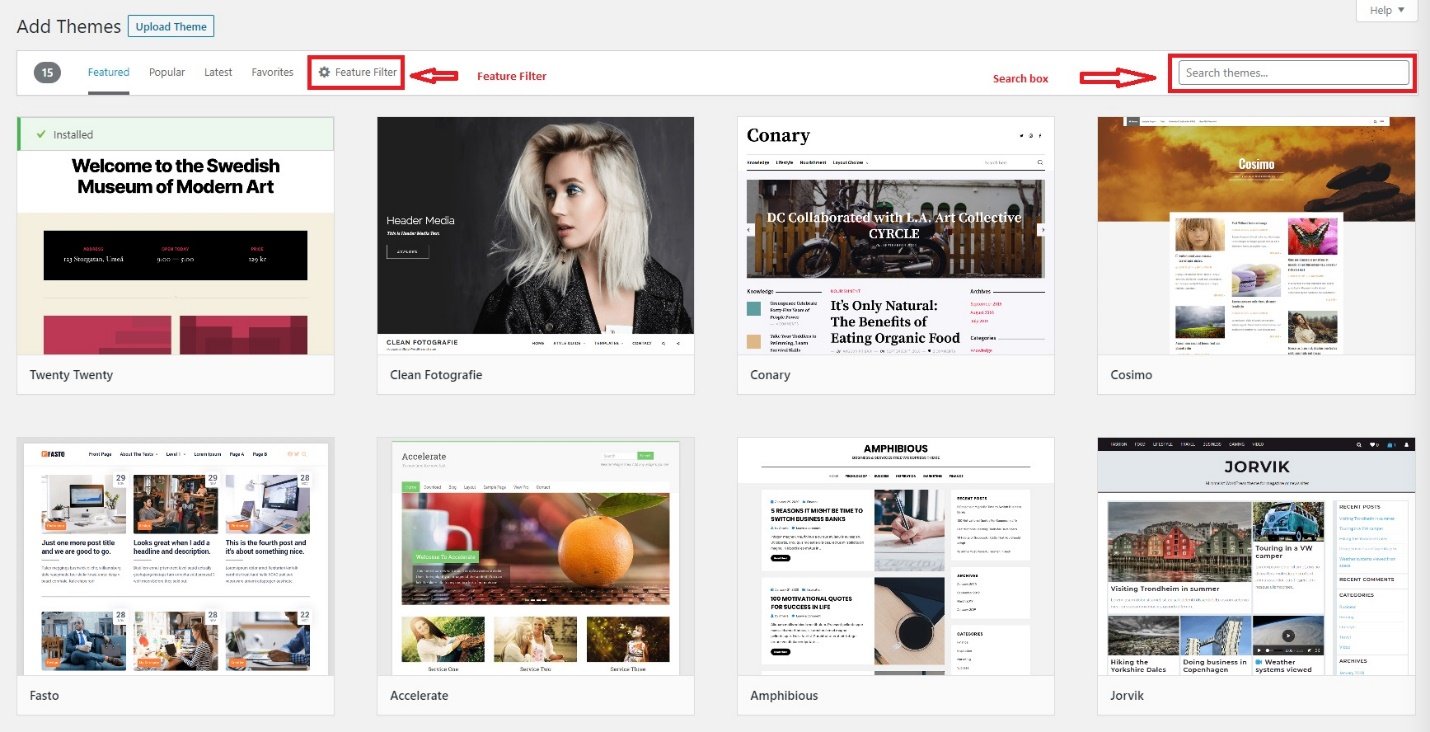
While you are on the admin dashboard, locate the menu item called Appearance on the left side of the screen. Hover the mouse on it to open the submenu, and from there, click on ‘Themes.’
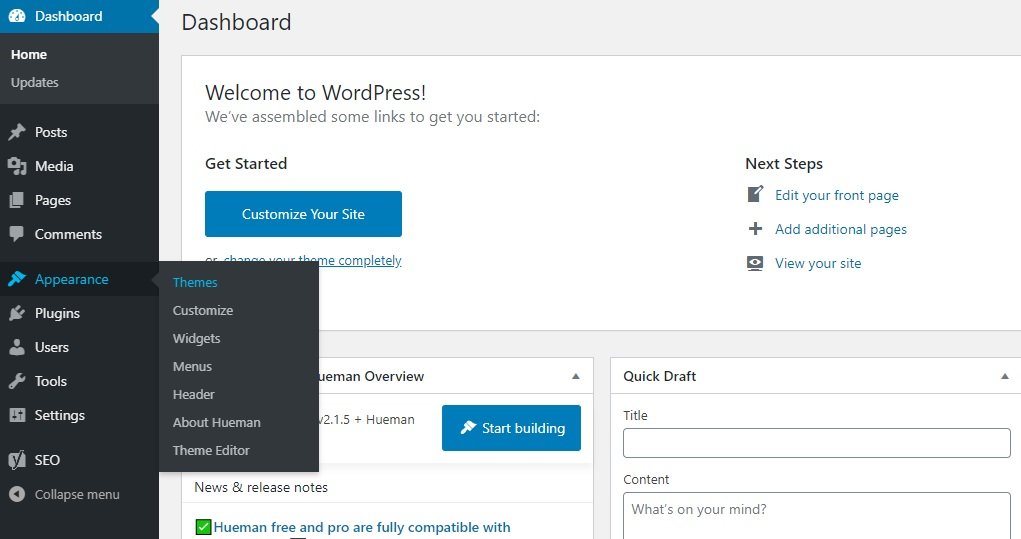
On the next page, click on “Add New Theme.”

On the next page, you can browse thousands of free themes. If you have any specific free theme in mind, you can search using the search box.
You can even apply feature filters to search for themes that provide the features you are looking for.
This is how the screen looks like:
Things to keep in mind while selecting a theme
Selecting a theme can be a bit daunting. However, it is fun at the same time. When you are looking for a theme, there are a few things you should keep in mind. They are:
- Your theme should have a responsive design. With more and more people accessing websites through their mobile devices like smartphones and tablets, this is a vital aspect. The theme you select should scale your website appropriately to fit the screen size of the device your blog readers are using.
- A theme should be very simple and lightweight. Too many functions and modules in a theme can make the theme heavy, which will, in turn, slow down your website.
- The theme you select should have a live customizer. You should be able to get a live view of the changes you are making to your website. Switching back and forth between frontend and backend is a headache. With live customizer, that shouldn’t bother you.
Here is what a live customizer looks like:

The white spaces with red borders that you see are the masks I applied to hide the content, the menu, and the website name. I cannot show them to you, because it is a website I am building for my client, and I cannot tell you the details without his consent.
What you can make out from this screenshot is that I am using the free Hueman theme. The customizer is on the left side of the screen.
Any changes you make there will reflect on the right side of the screen. It essentially shows you the frontend changes when you make changes on the backend.
To access live customizer, you have to use the following menu path as you see in the image below:
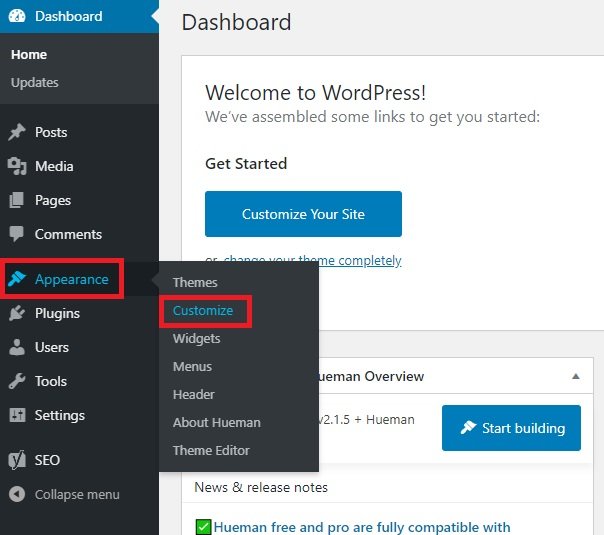
Once you settle down with the right theme and you customize your website design to your heart’s content, you need to go ahead and use some plugins that are essential for keeping your website safe and functional.
Installing and activating essential plugins
Before I give you a list of essential plugins, you must understand what a plugin is, and what it can do for your blog.
What is a plugin?
WordPress is blogging software. Every software comes with a set of limitations, no matter how versatile the software is. WordPress is not an exception.
It cannot do everything. It cannot create an e-Commerce site by itself.
It cannot provide options for collecting emails. It cannot track your website’s readers.
There are so many things that you will need to make your blog totally functional. How do you do that when WordPress doesn’t provide such functions?
This is where plugins come in.
Plugins are small software that can act as an addon to provide additional functions to your website. There are plugins for almost everything you can think of. For instance, there are cache plugins to cache your webpages and speed up your blog.
There are plugins for optimizing your images, for adding email subscription functions, for adding YouTube-like video galleries, and more.
However, you also need to know that these plugins are developed by people who did not develop the WordPress blogging software.
So, there are high chances that many plugins will not work correctly. Some plugins will break your blog. There are useless plugins, and then there are some plugins that will slow down your blog because of their bad code.
You should be choosing plugins very carefully, and you should not be using too many of them.
So, what are the most essential plugins that you will need?
Read on…
The most essential plugins you must install
#1. Yoast SEO plugin:
One of the most important aspects of blogging is Search Engine Optimization. What does that mean? It means that your blog content must follow specific rules that Google prefers. If you follow those rules and Google loves your content, it will show your blog posts in search results for relevant search terms.
There are many aspects of SEO, and one of them is to ensure that you have proper keyword density, you have a proper meta description, and a meta title for your blog post. You should have appropriately optimized images with well-defined image names and alt texts.
It is quite easy to miss out on various things. You will need a checklist that can help you to ensure that you are taking care of all aspects of the content you write. Yoast SEO plugin is one such option.
There are many other plugins like the Rank Math, All-in-One SEO, etc. You can select any, but Yoast is one of the most widely used SEO plugins. It is incredibly reliable, feature-rich, and yet, lightweight. There are both free and premium versions available, but the free version is enough.
#2. WP Rocket:
Your blog will need a cache plugin that can cache pages of your blog. Serving caches pages of a blog or a website through a browser ensures that your loads fast. Well, WP Rocket is a premium plugin. In case you don’t have the necessary budget, you can always opt for the free option of W3TC (W3 Total Cache).
I don’t recommend options like WP Fastest Cache, WP Super Cache, etc. because they tend to have conflicts with many themes and plugins.
No matter which cache plugin you use, you need to make sure that you are configuring it properly. Any incorrectly configured cache plugin can break your blog.
#3. Sucuri:
Website blogs and websites are vulnerable to threats like hacking, malware injection, and much more. Sucuri is a security plugin that prevents all that from happening. There are many others like Wordfence, MalCare Security, Defender, All in One WP Security & Firewall, etc.
I prefer Sucuri because it is lightweight and prevents all threats. I have been using it for over 3 years now, and I am happy with the results. Also, Sucuri is lightweight, well-coded, and easy to use.
#4. OptiMole:
You need to ensure that the images on your website are lightweight. You may use software like Photoshop or something as basic as Microsoft Paint to resize your images. However, the end result might not be very suitable for the web.
Images tend to make websites load slow. Google advises that you use the modern “.webp” version of images as they load faster. OptiMole is an image optimization service and image CDN (CDN stands for content delivery network) that optimizes images on the website, and deliver them through CDN.
What does that mean? It means that OptiMole will store copies of your blog images on various servers across the world and serve lightweight copies to browser requests from their servers instead of picking the images from the server where your blog sits.
This reduces the time it takes to load the image. Apart from that, OptiMole serves “.webp” images.
OptiMole is free up to a limit. However, since you are starting out your blog, the free version should be sufficient to fulfill your needs.
#5. UpdraftPlus:
Though I am not a big fan of using any backup plugin on WordPress blogs, I still suggest rookies use one. I take daily backups of my blog directly from the server. Taking server-end backups allows me to get rid of one extra plugin.
You may not be comfortable doing that. This is where UpdraftPlus comes it. It is a very useful backup plugin that can take backups of your blog files and database, and save them at a destination of your choice.
You should keep backup copies of your website. Anything can go wrong! The server may crash, it may be hacked, and whatnot.
You better keep a copy of your blog because that will allow you to recover everything in the event of a mishap. Make sure that you are backing up the MySQL database of the blog. This database is the backbone! Without it, nothing will work.
#6. WPForms:
This excellent plugin will help you to create beautiful and functional contact forms without worrying about background coding. It has a drag-and-drop form builder. The free version limits the number of fields you can use in the contact form, but hey, all you need is a form that will allow your readers to contact directly from your website.
The most basic form that you can create with WPForms is enough to give you that. You don’t really need anything extra.
#7. Cloudflare CDN:
At this point, you don’t need a premium Cloudflare plan. The free plan is just enough for a startup blog like yours. Install the plugin from the WordPress plugin repository. You will need a Cloudflare account. You can do that directly from the WordPress dashboard after you install the Cloudflare plugin.
Here is what you will see:

Cloudflare will give you an API key that you need to use. You can get it directly from the Cloudflare website. You have to log into your account and get the API key from there.
You can get the API key from your profile page on the Cloudflare website. You will get something like this:

I covered the part of the key because it is an API key that should be known only to me.
You can fiddle around with Cloudflare settings right on the Cloudflare website. I will create a tutorial for that sometime later. You can set up Cloudflare even from your server.
Once you set up Cloudflare plugin properly, all the static files of your website will be stored on the Cloudflare server (don’t worry, it will be a copy of the files on your hosting server). Cloudflare will then serve these files from its CDN servers across the globe to speed up your website even further.
Cloudflare also provides an extra layer of security to your website and thwarts hacking attacks.
Okay, that’s the list of all essential plugins you need to start with. You may add a few more plugins later on to meet the specific needs of your blog. However, make sure that your plugin count never exceeds 15. That’s my opinion. Some may say you shouldn’t have more than 10, while others will say that it is okay to have 20 plugins.
I usually keep my plugin count to 8 or 9. In the worst-case scenarios, I go up to 12. That’s a lot! I am obsessed with speed. Adding too many plugins will reduce speed. You better don’t do that!
How to install plugins?
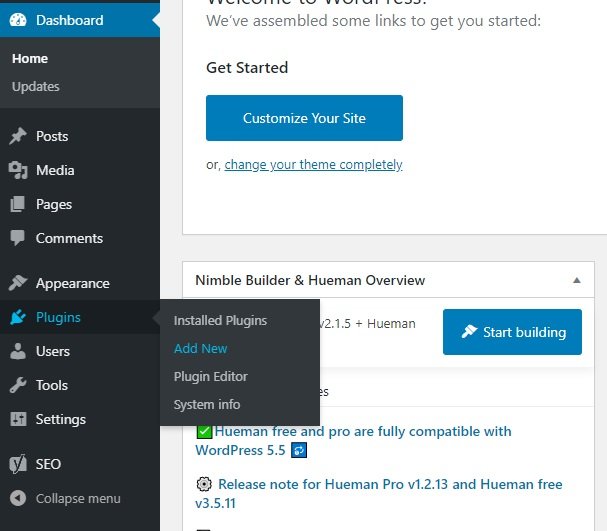
I told you which plugins to install. What I didn’t tell is how to install them! It is a simple process. You need to be on the dashboard of your WordPress blog. From the left menu, find the ‘Plugins’ option. You can find it under the ‘Appearance’ tab.
Hover the mouse over the ‘Plugins’ option, and then click on ‘Add New.’
Take a look at the image below:
Once you click on ‘Add New’ option, you will see this page:
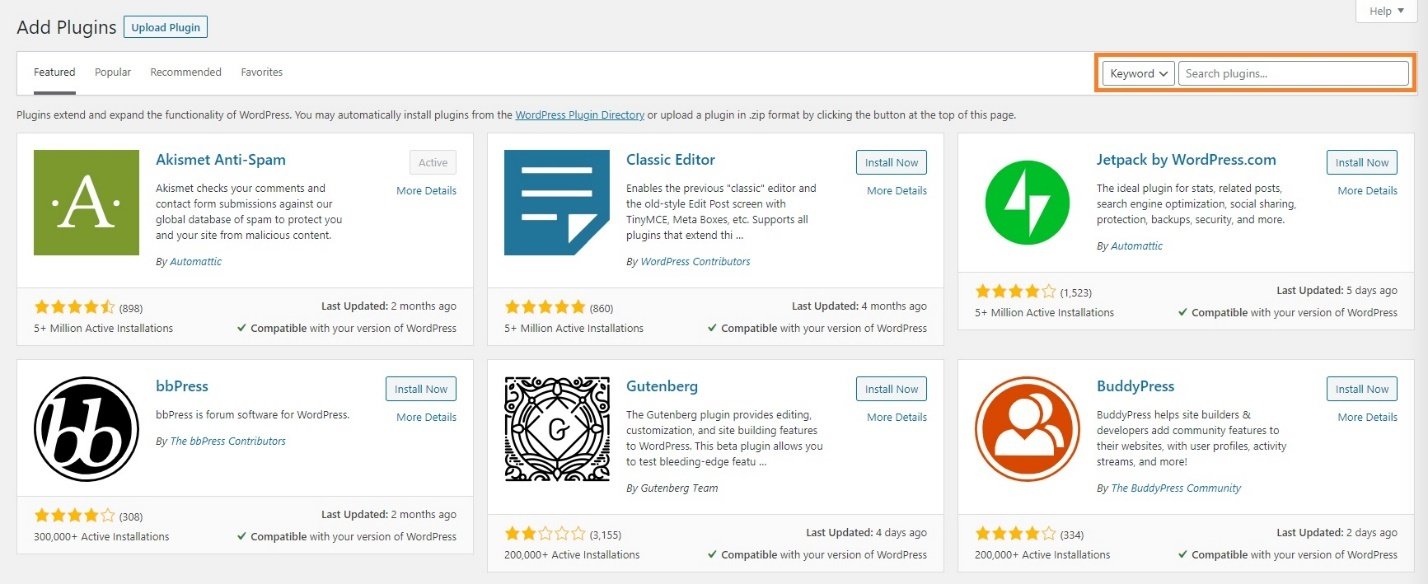
Use the search field to find the plugins you need and then click on the ‘Install Now’ button to install the plugins. Once the installation finishes, you will see another button that reads ‘Activate.’
This is what you will see:

Once you activate a plugin, you can go ahead and play around with the individual plugin settings.
Basic WordPress settings you should know
Okay, once you have taken care of the theme and plugin, it is time to fiddle around with some basic settings. You need to set them properly to ensure that your website is finally ready.
What are those settings?
Read on…
Optimize permalink settings
When you use Bluehost, the permalink structure is by default set to something like this:
“https://DomainName.com/post-title”
This is what you should always use. This is called pretty permalink, as it is easy to read and remember.
There is a slim possibility that the permalink structure is not set correctly during the WordPress installation. You can quickly do that from the Settings menu of your dashboard.
This is what you will see:

If the permalink structure is not set to ‘Post Name,’ select that option and hit the save button.
A pretty permalink with post name is the most desired format for any blog. You should not keep category, date, etc. in the permalink (which is what we usually know by the name ‘URL’) because of the following reasons:
- Extra information can make the URL too long. Long URLs are not easy to remember.
- Adding a date will give a sense of expiration to the post. Dates usually go well with the news website. Since you are starting a blog and not a news website, getting rid of the date is necessary.
Set the blog URL to www
Which one of the two formats below do you like the most?
- https://ibakecakes.com
- https://www.ibakecakes.com
To me, the second option looks better. But again, that is my personal preference. You may like the first option more.
In case you like the second option, you need to set that from the settings menu of your dashboard.
Head over to Settings >> General and change the WordPress address and Site address. This is what you will see:
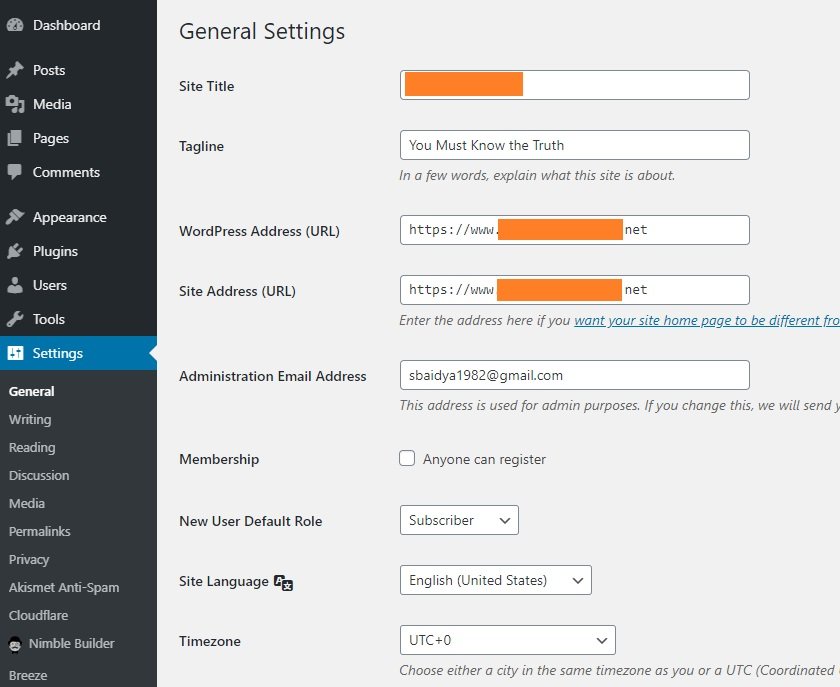
Once you do this, the blog will now automatically redirect to the ‘www’ version. Though the two versions – the one with www and the other without it – do the same thing, there is a psychological game here. The version with www looks more trustworthy, and you should tap into the psychology of your readers.
Set the blog homepage
The homepage is the place where your visitors will come when the directly type in the URL of your blog on their web browser. This is where they will see everything. You have to make sure that it is attractive.
There are two types of homepages you can use for your blog. One is a static page, the other is a blog list page.
I will suggest you choose for the blog list as your homepage. That’s more suitable for a new blog or a personal blog.
This is what a homepage with blog list typically looks like:
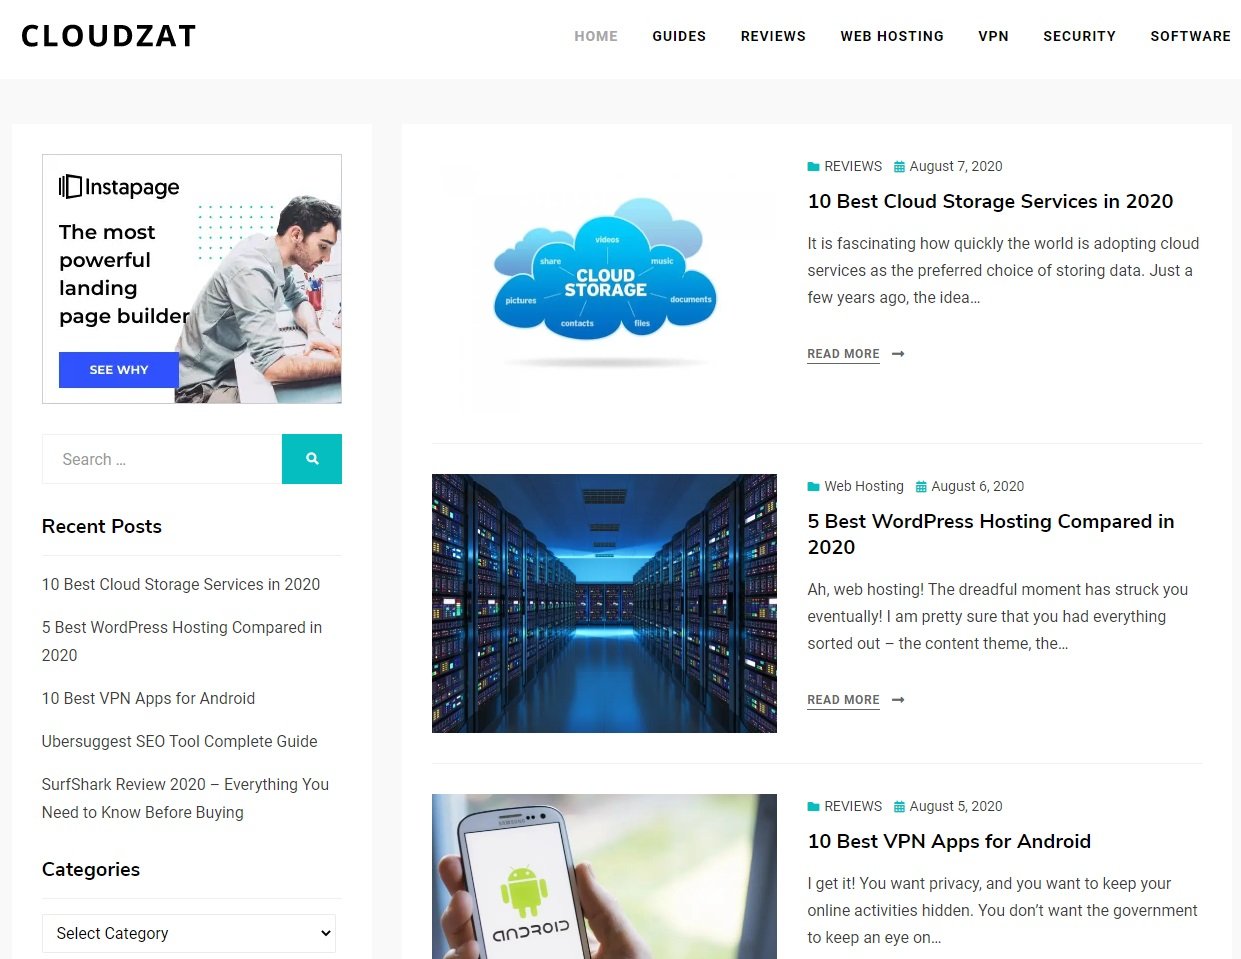
It shows a list of your latest blog posts in descending order. The latest posts will show up on the top, and the older posts will show at the bottom.
This is a more logical homepage for a blog because that is what you are focusing on – fresh content at regular intervals.
You are not a company that provides specific services. A company is better off with a static homepage.
How do you set the homepage on your WordPress site?
Head over to Settings >> Reading on your blog dashboard. This is what you will see:
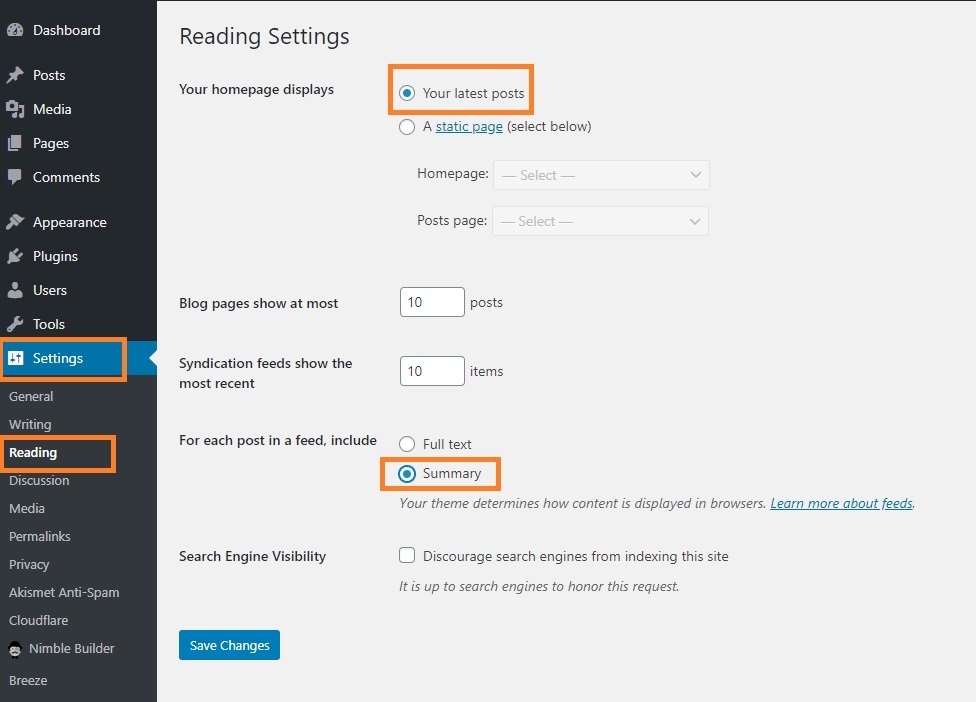
Use the highlighted settings on the page. You may decide to show the full text, but trust me, that looks totally weird!
Since you are starting out with the blog, you may want to show the full text on your homepage to make it look fuller. However, make sure that you change it back to ‘Summary’ when you have around 5 posts.
The homepage is essentially a feed of your blog posts. It is a place where people will scan through the different posts on your blog. Giving the entire blog post on this page doesn’t make sense.
Prevent comment spam
Comment spam is something every blogger in this world has to deal with. Sooner or later, you will be hit by comment spam. You will get unrelated comments on your blog posts.
Many of them will advertise Viagra. Others will advertise porn. Some others will tell you about the secrets of becoming millionaires overnight!
You need to stop all that to ensure that your blog remains clean.
There are several ways to achieve this. Here is a quick list:
Stop comments completely
I will never suggest this. Your genuine readers may want to communicate with you, and commenting is one of the most natural methods for them. However, many blogs do not allow commenting. You should do this only when your blog is about something that doesn’t allow room for much public interaction.
Honestly, I have never come across such blogs. I have heard of them. I never had the first-hand experience with such blogs.
But if you want to stop comments entirely, it is your choice. You can do so by using this:
Settings >> Discussion
Here is the exact setting you need to use:

Uncheck the highlighted box.
This will turn off all comments to your blog posts.
Turn off anonymous comments
Most of the comment spammers will try to stay anonymous. One easy way to prevent that from happening is to force them into giving email and name.
However, I never found this to be an effective tool. You can still keep it on.
Go to Settings >> Discussion and use the following settings:

Keep the highlighted box checked.
Manually approve comments
The best option for you is to manually approve comments. This step will allow you to check each and every comment before publishing them. Anything suspicious, just mark it spam and clear the spam comments folder.
The setting that you need to use is:

Keep the box checked to ensure that all comments are held for moderation. You can also tick the second option to reduce your workload.
The second option will ensure that only those readers who have previously approved comments can post comments on your blog without waiting on the moderation queue.
Use link count in comments for moderation
This is a small trick, but it works. Comment spams will generally have hyperlinks or URLs to shady and spammy websites. Sometimes, they will have more than one link.
You can make a comment go into the moderation queue by telling your blog’s backend that any comment which has even 1 hyperlink or URL must go into the moderation queue.
This is the setting you need to use:
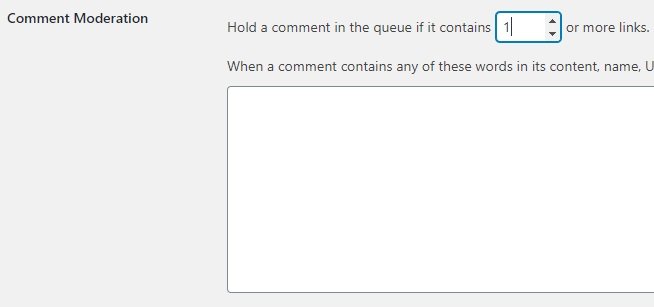
In the image, you can see that I have set the number to 1. This means that if a comment has even one link, it will be held for moderation.
So, what should be the overall comment settings? Here is what I ideally use:
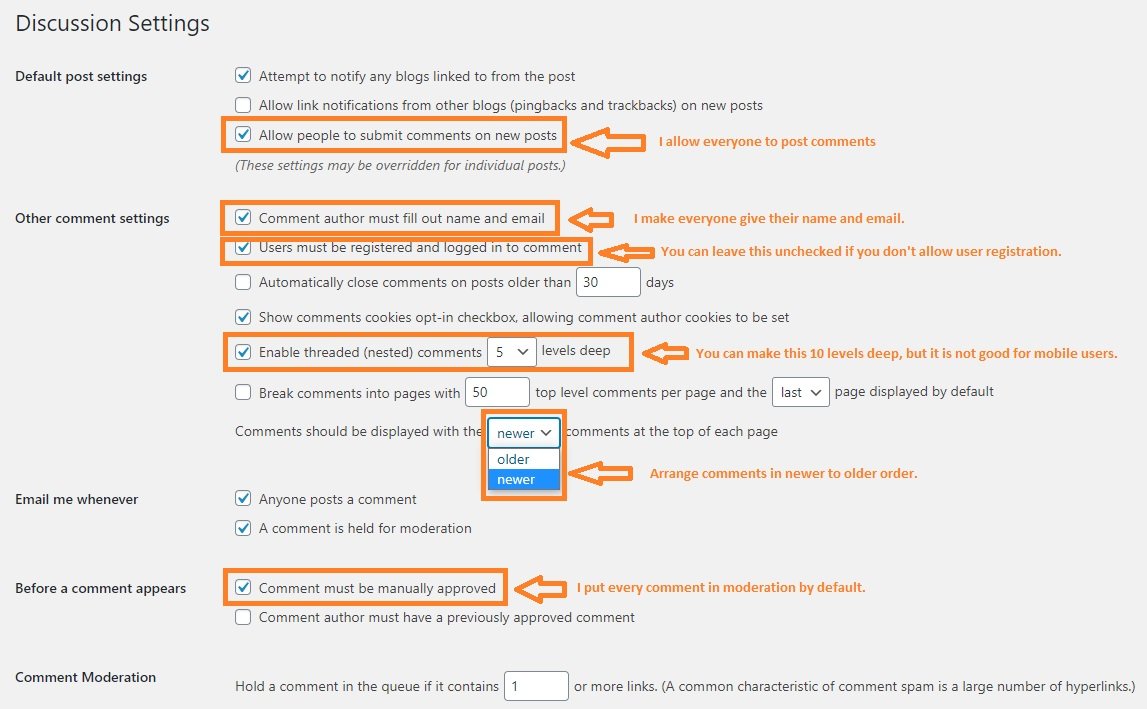
Since I do not allow any comment to get published without moderation, I don’t have to worry about any other setting in Discussion settings.
People may tell you to use plugins to stop comment spam, but honestly, I don’t see how a plugin comes in handy when you already have very powerful comment spam moderation features available by default.
One less plugin will mean faster speed.
Akismet is one such plugin that people generally use, but Akismet is just too heavy. I never needed it anyway. The setting you see above is more than enough to kill comment spam on your blog.
Set blog menu
Your blog menu may contain a combination of pages, categories, posts, and custom links. In general, it is almost always made of categories and pages. The only custom link that you may use is that of your blog’s homepage.
How do you set the menu?
The first logical step is to create the categories and pages that you want in your blog menu. You need to do this for creating categories:
Dashboard >> Posts >> Categories
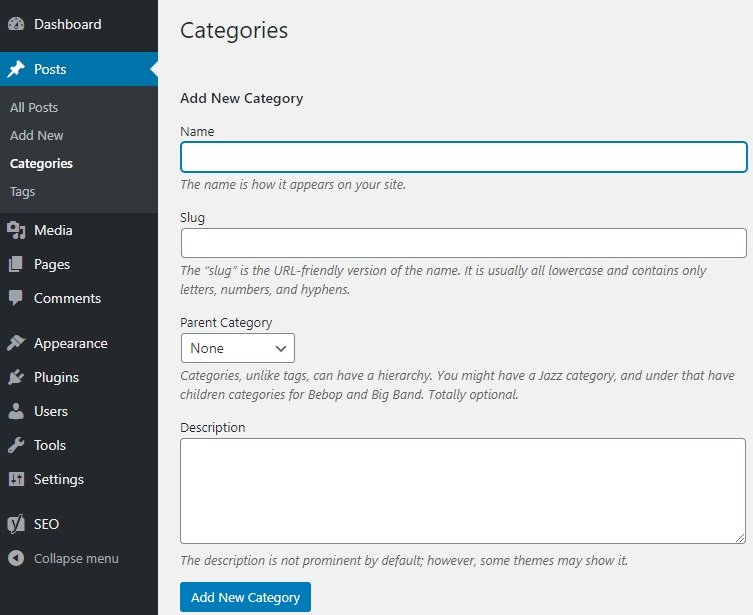
Go ahead and create a new category and hit the ‘Add New Category’ button. Don’t worry about the slug. WordPress will automatically create slug.
For example, if the category is ‘Eggless Cake Recipes,’ the slug that WordPress will create is ‘eggless-cake-recipes.’
Create all the categories you need.
Once you are done creating the categories, move on to create a few pages that you want in your blog menu.
Do that by going to:
Dashboard >> Pages >> Add New
Create a new page by adding a title and some content. Hit the publish button.
Repeat the process for all the pages you want.
Ideally, you should have the following pages:
- About
- Privacy Policy
- Terms of Use
- Contact
You can add more pages if you want.
Once you have the categories and pages that you want to display in the menu, it is time to make the actual menu that people will see and use.
How do you do that?
By heading over to Appearance >> Menus.
On the page, click on “create a new menu.”

Then give a name to the menu and click on the ‘Create Menu’ button. It will look something like this:

Once you have created a menu, you need to add menu items. Add items from the left accordion boxes. This is what you will see:

You may want to add custom links. For that, click on the Custom Links accordion on the left. Add the URL and the Link Text, and then click on “Add to Menu.” This is what you need to do:

Once you are done with the basic structure of the menu, you can go ahead and play around with the settings.
If you want icons on your menu, you will need a separate plugin. Install a plugin called “Menu Icons” designed by ThemeIsle. I prefer this plugin because it is compatible with the latest WordPress version, and almost every theme I have tested so far.
Once you install the plugin, come back to the menu and start playing around. However, make sure that you enable all the icon providers in the settings. You can do that quite easily from the menu-creation page.
Here is what it looks like:
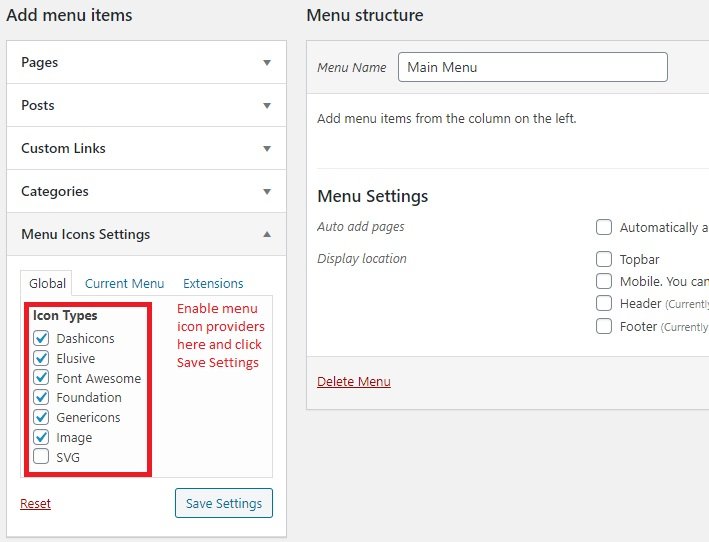
Menu icons are a choice. I love icons on the menu, and hence I add them. You can skip doing that.
Setting up the most important pages of your blog
Which, according to you, are the most important pages of your blog? I will assist you. There are four most important pages, and I have already mentioned them. They are:
The About page
It is, by far, the most important page of your blog. It will either keep your readers or repel them. It has a great marketing tool that should tell your readers why they should read your blog.
So, what should be on your About page?
Here is a brief – “Tell people what value you are creating for them.” One mistake that many bloggers make is that they tell about themselves. Well, you will, but later! The readers take the first priority here.
So, answer the following questions here:
What value is your blog creating for your readers?
If I stick with the example of cake baking, the blog has to offer something great to the readers. What is that?
- Are you explaining the methods of making different types of cakes that your readers can learn, and later start their own business?
- Can your readers use your recipes to improve on their existing baking skills?
- Are your recipes meant for experienced bakers, or are they for rookies?
Highlight anything and everything that helps your readers.
Once you tell them what they can get out of your blog, you can divert attention to the next question.
Who is your blog for?
There are different types of people who will read your blog. Who are those people? Professionals, working moms, new business aspirants, hobbyists?
List them all!
Don’t just list them! Tell how each one of them is going to benefit from your blog.
Who on earth are you?
Are you trained in cake baking? Or, are you a person who learned by practicing? Are you popular? Do you write for other famous online (or offline) publications? Whatever the case be, it is wise that you be honest.
If you have achievements, highlight them. Give links to your famous publications.
Why should your readers read you blog?
This is the segment where you start bragging a bit. It won’t hurt! The reason is simple! You have clarified what value you are offering, who you are, and who your blog is made for.
Now you can tell them the type of posts you write here, where they need to start, what propelled you to start this blog.
Don’t shy away from getting personal.
A blog is all about getting personal. Later, when you write blog posts, you have to maintain that personal tone.
You can tell a few things like these:
- If you love cake decorations, you will feel right at home.
- Here I share all that I have learned and started a journey towards my 5-figure monthly income starting from zero.
- Back in 2010, I was broke. My friends helped me by getting the necessary tools I need to start my baking business. Thanks to them and their help all along, today I run a successful business. I am the top wedding case supplier in Atlanta.
Show them a few photographs or whatever you can to prove your point. These things will draw their interest, inspire your readers, and keep them on your blog. They will subscribe and keep coming back!
Take as much time you need to make this page. You can keep it simple, but I will suggest you use some free page builder plugin like ‘Elementor (they also have a Pro version),’ or ‘Nimble’ to create a stunning page.
It will take you several days, maybe a week or two, to create something stunning. But in the end, it’s worth the time and effort you put in.
The Privacy Policy page
This is the second most important page of your blog. Most people will not read it, but some will. It will have the legal aspects of your blog.
If you are showing ads on your blog, if you have subscription options, you have to clear about all those things.
If your readers are from Europe, you have to comply with GDPR.
When you create a blog, you will be using customer data – directly or indirectly. You need to clarify how you use the data, who you share it with, who retains the data, who processes the data, how is that data used, and on…
For example, you may have a subscription page where people provide their email ID. If you have enabled it in the Discussion setting, people will have to give email and name if they post a comment.
What happens to that data? Do you possess the data? Do you sell the data? What do you do with it?
Do you use tracking cookies to understand user behavior? Are you using third-party ads like AdSense?
You have to mention all these things.
If you need help with the Privacy Policy page, you can check out the one you see on this website. If that doesn’t feel sufficient, go and read the privacy policy page of some of the most famous websites in your niche, or any niche.
Compile your privacy policy page using cues from different sources.
The Terms of Use page
This is the third most important page on your blog. Here you need to tell people what they can and cannot do on your blog.
You can tell people that they cannot plagiarize your content. If your content is totally original if you are the legal owner of the images you are using on your blog, clarify everything.
Speak about the commenting policy in place. Speak about linking policies.
Talk about anything that matters when it comes to safeguarding the interest of your blog.
Your blog is your intellectual property.
You can go through the Terms of Usage or Terms of Use page of different websites and figure out what they write there. You can then tailor the page according to your needs.
The Contact page
The contact page is the fourth important page on your blog. This is where you give your readers a scope to contact you.
How do you design it? It depends on what you are offering on your blog. If, for example, you are also selling your services as a wedding cake supplier, you will need to talk about your experience.
You can tell them your approach to provide a personalized cake for a wedding. You can show examples.
Highlight your strengths and tell people how you can help them.
After you are satisfied with your marketing pitch, you need to embed a contact form using on that page.
Remember the WPForms plugin that I told you to install? It comes into play here. Create a nice form using the drag-and-drop function, grab the shortcode, and finally, embed it on the contact page.
In case you are not offering any services, and you are just a hobbyist, you can add a contact form to the page without putting a marketing pitch.
Again, I will suggest that you go through some great contact pages of some of the most popular websites and blogs. Draw inspiration, never copy!
Okay, if you have read this far, I am sure you are almost there. Your blog is ready, and now you should prep yourself for the first blog post.
Time to move on to chapter 3.
Chapter 3: Developing a Content Strategy
Before you jump straight into writing something, you need to develop a content strategy. What on earth is that?
It is basically a set of guidelines you set for yourself and your blog. In involves a lot of things that include (step-by-step):
- Researching the audience group that you will target.
- Researching keywords and topics in your niche that people are searching for and are reading.
- Finding great content ideas hovering around those topics and keywords. This is where competitor analysis comes in.
- Creating a content calendar. You can use various tools to create a calendar for the month, and then follow that calendar.
- Creating pillar contents – this is absolutely necessary.
Sounds very confusing? Don’t worry, it is not! While some people will ask you to first create a couple of content pieces for your blog before you come up with a strategy, I suggest the other way round.
You need to have predefined goals for your blog. These goals will drive your blog to success. If your goal is to make money, you have to be patient and understand what people are looking for.
Creating random posts won’t help. You have to create something that people want to read. This is where research comes in.
No, you don’t need to be a millionaire to conduct research. There are free but extremely powerful tools that you can use.
Let’s start with audience research.
Understanding audience group
Your blog will make sense only if you have an audience. To bring in the audience, you need to understand what they are looking for, what they are talking about, and, more importantly, you need to find them.
How do you do that?
There are at least three extremely powerful, and yet underrated tools that many people do not use.
Here are these:
- Subreddits on reddit.com.
- Quora.
- Facebook groups.
You don’t need money to browse these places. All you have to do is to go ahead and type in a few keywords and see what people are talking about.
Not only do you get a lot of information about the overall buzz, but these platforms also give you a potential place for marketing your blog. What’s impressive about these platforms is that they can tell you what people cannot find.
If you can know those things that people want to read, but cannot find, you can create content pieces that can fill in that void. This will make your content stand out.
Researching keywords and topics
Once you know your audience and what they are talking about, you have accomplished a lot. You have a fair idea of what they are talking about, and the type of gap you need to fill in with your content.
But…
What should be the exact keyword? This is where a keyword research tool comes in handy. I will not ask you to go for something like Google Keyword Planner because that is quite difficult to understand.
You have just started out. You need something easier.
There are many tools out there that can help you. For example:
- Ahrefs
- SEMRush
- Ubersuggest
- BiQ
Unfortunately, they are all premium.
Don’t lose hope. There is a solution!
Ubersuggest by Neil Patel is one of the finest and easiest SEO tools that you can use. There is a free version of it available. Though quite limited, you can still use it.
Unlike tools like ahrefs, SEMRush, etc., Ubersuggest is very user-friendly, and it is a perfect option for beginners.
Honestly, I still use Ubersuggest, and to this day, I find SEMRush and ahrefs, quite overwhelming. There are too many options to deal with.
Ubersuggest decluttered everything and came up with a simple interface that produces actionable insights.
I have written a complete Ubersuggest guide that you can refer to. Because I have covered this keyword research segment in great detail in the guide, I will skip it here.
Content ideas
The next most daunting task is to come up with content ideas. The problem with keyword research is that it will tell you the search volume, the related LSI keywords, and the list of websites that rank for those keywords.
The question is, “what content do they write that help them rank for those keywords?”
This is where content ideas come in. You need to go ahead and find out what your competitors are doing.
You need to find out the type of blog posts they are writing.
How do you do that? Should you go to each individual blog and make a list?
No! Not really, no!
That’s foolish! And a total waste of time.
Say thanks to Ubersuggest! It makes your life simple.
The tool has a feature called ‘Content Ideas.’
Use it to find the list of great performing content pieces from your competitors. How do you do that?
Just read the guide! I explained everything there.
Content calendar
Once you have the keyword ideas and the content ideas, it is time to create a content calendar.
This is important because you need to be consistent with your blog posts. You need to have a routine.
As I said at the beginning, blogging is not about the short term. It is about the long term. There has to be a lot of consistency. A lot of effort needs to go in.
You don’t have to look too far to get a tool that can help you create a content calendar. Something as simple as Google Spreadsheet or Microsoft excel will do.
You can create a table like this:
|
Keyword |
Search Volume |
Title/Content Idea |
Proposed Publication Date |
LSI Keywords to include |
Key topics to cover to fill the content gap |
|
Eggless cakes |
20,000 per month |
How to make a spongy eggless cake that tastes really great |
August 15 |
1. How to make a spongy cake without eggs 2. Do eggless cakes taste good 3. Things you need to make an eggless cake |
1. Step-by-step guide 2. Ingredients list 3. Nutrition info 4. The time it takes to bake 5. Perfect for people with what types of health conditions |
You can create a long list like this to cover the entire month. It is not necessary to publish a post every day. You can select a comfortable frequency. For example, you may want to do only 3 blog posts a week. This makes 12 articles a month.
That’s perfectly fine. However, you need to be consistent. You should be ready to post at least 12 articles a month, no matter what.
Pillar content – what is it?
Pillar content or cornerstone content refers to the most detailed articles on your website. This article that you are reading here is a pillar content.
You need to keep creating these pillar contents from time to time. They will be the backbone of your blog.
All the blog posts you create can link back to these articles whenever necessary.
For instance, you can create a pillar content which says something like this:
“Eggless Cakes – What, Why, for Whom – Everything You Ever Need to Know”
What should you write in the body?
Here are a few ideas I can come up with:
- What is an eggless cake, and how it differs from regular cakes?
- Can eggless cakes be chocolate cakes?
- Can you make eggless butterscotch cakes?
- Bla, bla, bla…
- Why should you make eggless cakes?
- How to make eggless cakes in a pressure cooker?
- How to make eggless cakes in an oven?
- Who can eat eggless cakes?
- Can people with certain health conditions eat eggless cakes?
- Types of decorations you can use for eggless cakes.
Think over and over. The more you think, the more ideas will come. Make these articles as long as possible.
I will say, somewhere in the range of 15,000 words to 20,000 words is perfect. If you can go further, it is even better!
Pillar content will help you rank on Google searches. People will want to link back to your website.
Make sure that the pillar content you write is the best available resource on the web. Someone someday may create even a better one than yours.
It is okay! Things like that happen. What you can do then is to go ahead and read that better version, take ideas, come back to your blog and update the article.
What should be the frequency of these pillar contents?
I will say two a month is great! But that is in addition to the 12 blog posts you are already targeting. This will take your total tally to 14.
Pillar contents are very extensive articles that require a lot of data and accurate information. It means that you will have to do a lot of research on each topic.
So, take your time. It is okay if you can write only one. Try creating two of those at later stages.
Important Note: I told you to use the Yoast SEO plugin. That plugin has a feature that allows you to mark a particular blog post as a cornerstone article or pillar content. When you do that, the plugin will tell search engines that your article is a well-research, thorough, and extensive article. Apart from that, whenever you create a regular blog post, the plugin will give you suggestions to link back to that article, improving your internal links. What else? Since cornerstone articles or pillar contents rank high on Google search results, the posts that link back to those pillar contents will get some link juice and start ranking on Google.
Chapter 4: Creating Your First Blog Post
Once your blog is ready, and you have a content strategy in place, it is time to write your first blog post.
You can start with a pillar content, or you can start with a regular piece. It is your choice.
Here are the steps you need to follow:
Creating an outline
Before you start writing, start by creating an outline of the article. You should create a roadmap of what to include in the article, and in what order or logical sequence.
There should be a continuity, a connection between the different segments of your blog post. They should not appear isolated.
Start by listing the questions that you want to answer in that post. Arrange the questions in a logical sequence.
Make a list of headings and subheadings you will use.
Once you have created an outline, you can quickly write the article without any hiccups.
Writing the actual content
Once you have the outline ready, start writing the article. Many people will say that you should write directly into the WordPress blog.
I don’t support that.
You should start a document processing application like Microsoft Word or Google Doc. They have powerful proofreading capabilities.
You can improve the proofreading abilities of these applications using the Grammarly plugin.
Look, I get it! When I speak of proofreading, I may be offending you, especially when you are a native speaker.
But don’t forget one thing – ‘human error.’ There can be typos. There can be a better way of constructing a sentence. Grammarly can help you with that.
Yes, Grammarly is a premium service, but they have a free version as well that is sufficient to rectify common errors with punctuations, typos, etc.
That’s good enough!
The three most essential tools that I will suggest you use while writing your content are:
- Grammarly.
- Any free plagiarism checker (you should not be copying anything from other websites. You may take ideas, but no direct copying).
- Content Watch (make sure that your content is at least 85% unique).
When you start writing your content, keep these things in mind:
- Try to use the keyword/keyphrase in your title.
- Try to include the keyword in the first paragraph of your post (not a necessary thing to do, but it helps)
- Try to keep the keyword in at least 50% of the headings and subheadings. This is, however, not a necessary condition.
- Include the keyword or the key phrase throughout the content. The keyword density should not exceed 2% of the total number of words you write. I personally prefer to keep it to 1.5%. So, if your content is 2000 words long, you should not use the keyword any more than 40 times. Rather, try to keep it within 15-20 times.
- Try to include as many variations of the keyword or key phrase as possible.
- Follow the KISS rule. KISS is an acronym for Keep it short and simple. Use simple English that everyone can understand. Don’t use the spoken format of the language you use daily.
- Write small paragraphs. Use the rule of 3-sentence-paragraph. Don’t forget that people may visit your blog through a mobile device. Long paragraphs on a mobile device will look really ugly.
- Try to use a conversational tone. Use I, you, etc. Talk to your readers. This will make them feel special. You should use this tone throughout your blog.
- Minimize the use of passive voice. Write mostly in an active voice.
- Make your content scannable. Did you know people are slower when they read on digital screens? You should give them the ability to quickly scan your content. Use headings and subheadings, bullet points, bold out the important texts, use underlines whenever you think is right.
TIP: After the first paragraph of your blog post, try to summarize the entire content in two to three sentences. Don’t give away too much. Keep your readers guessing!
Remember, you are the ringmaster here. The words you write will follow your command! Give your best!
Images & Videos
Stunning images and great videos have the potential of keeping your audience glued to your website. They play a significant role in improving overall user engagement.
You must use them properly.
There are a few things you need to keep in mind.
- Use large images, possibly vertical images in the body of your blog post (ideal height of an image should be 800 pixels). This is a trick to make your page longer. The longer the page, the more ad placement opportunities you get.
- Never use copyrighted images. Remember, picking up an image from Google image search doesn’t make them copyright-free. Google only indexes those images. The copyright still remains with their respective owners.
- If you are creating videos, make sure that the video length is at least 3 minutes. Don’t cross the 15-minute mark. People don’t have enough patience to go through long videos. 3 minutes is just the right time.
- Don’t use copyrighted images or music in the videos. Find free-for-commercial use music and images.
- Don’t use outrageous music. Use something soothing! Kurt Cobain’s music is no suitable for making videos for your website. Use instrumental music. They work great!
- Try to give voiceover instead of music.
If you are wondering where to get copyright-free images, here are two sources:
For copyright-free music, you can visit these sites:
In case of music you download from the two sites, you may have to give credits. That’s fine!
In the case of videos, you will need a video editing software. There are free options available, but most of them are not so great, or they limit the video length. Some will add watermarks.
If you don’t have any budget for now (which is more likely), you can go for options like:
- Kdenlive
- OpenShot
- Shotcut
All three options are free, with no limits on video length. They will not add any watermark, either.
If you can spend some money, I will suggest:
- Animotica (available only for Windows users, and it is very cheap)
- Movavi video editor (slightly pricier, but easy to use, and powerful)
Uploading to WordPress
Once your content is ready, it is time for you to upload it on your blog. How? Here is a detailed step-by-step instruction:
The first step here is to visit the WordPress dashboard and create a new post. Here is the menu chain you need to follow:
Dashboard >> Posts >> Add New

Once you click on “Add New,” you will reach a page where you can copy and paste the post you wrote on a word processor document.
This is what you will see:
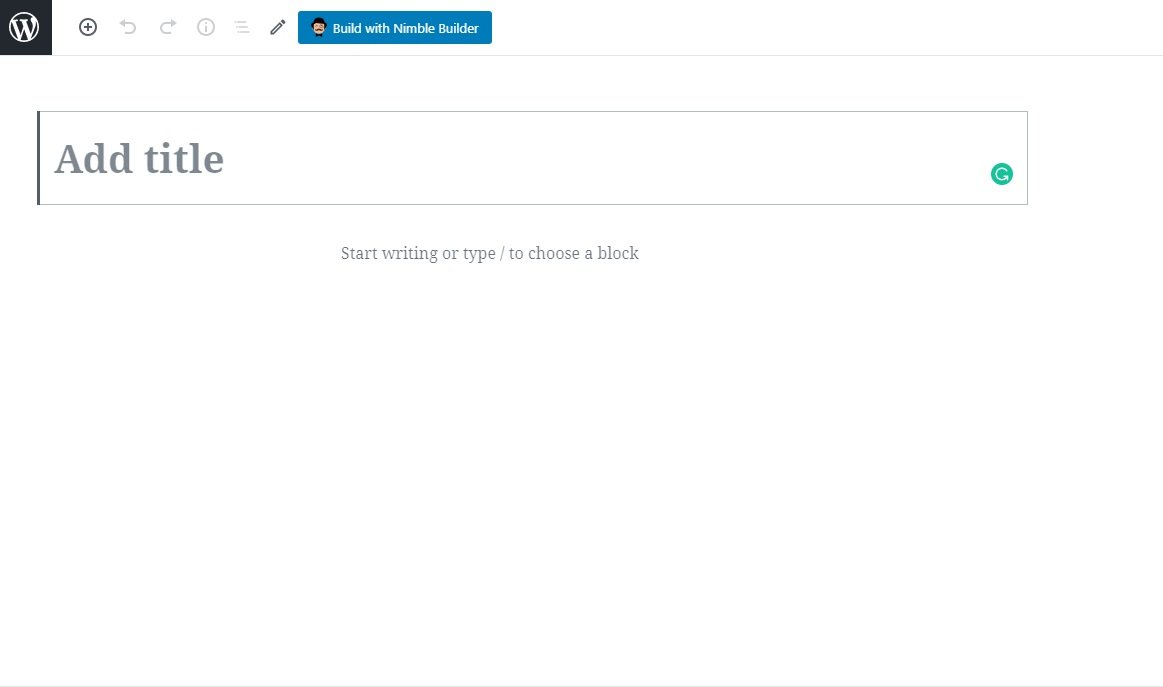
What you are seeing here is the new Gutenberg block editor of WordPress. It is a fun thing to work with.
Simply add the title you used for your post in the place where you see “Add Title.” Hit the enter or return key on your keyboard and paste the entire article. Each paragraph will automatically occupy a new block.
This is what you will see:

You can drag and drop each block if you want to rearrange the content. It is effortless. Try it out! You can even edit or change the characteristics of each block. It is a fancy little editor, I will say!
On the right side of the page, you can see this:
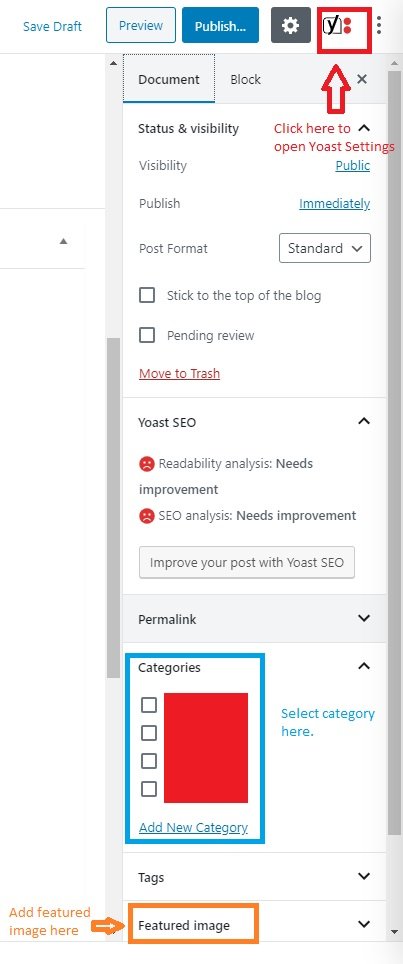
If you want to open the Yoast SEO settings, click on the Y icon you see on the top. You will see this:
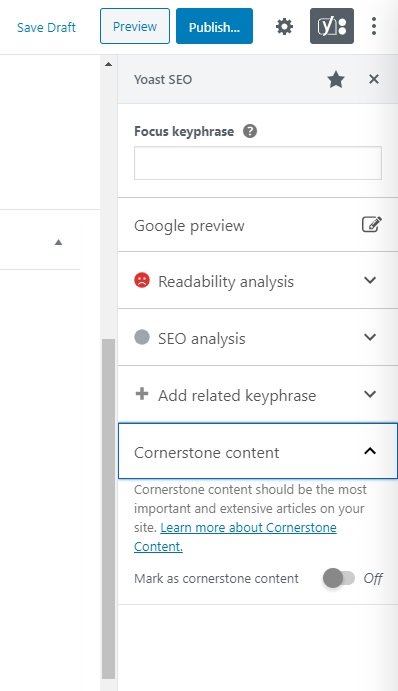
You can set the article as cornerstone content, add a keyword, add SEO details, and more!
Remember to keep saving the post as a draft. Hit the “Preview” button to see how your post looks on the frontend.
Once you are satisfied, click on the “Publish” button!
Yay! Your first post is live.
Now, keep posting as per your content calendar!
Chapter 5: Marketing Your Content
This is going to get tricky! So, gear up!
Marketing is not easy. I really wish that blogging was all about creating a blog and writing content.
Back in the 2000s or earlier, it was precisely that! The competition was low, and all you had to do is write and wait. Google would anyway index your content quickly.
Even today, Google will index your blog and show it to prospective readers. The only difference between then and now is that today there is too much competition. Google may take months to index your content.
So, what do you do?
Here are a few tips that you can follow:
Submit your site to Google
If you want Google to index your content, you will have to submit your site. When you set up Yoast, you will get the option of creating a sitemap. It is a must!
I will do a Yoast guide later, but for now, let me assume that you cracked the secrets of Yoast plugin and managed to configure it. Now pick up the sitemap URL from the plugin and head over to Google search and now the steps:
Step 1: If you don’t have a Google account, create one.
Step 2: In the Google search page, type in ‘Google Search Console.’
Step 3: You don’t need to create a separate account for that. Your Google account will do.
Step 4: On the search console page, type in the URL of your blog. This is how it will look:
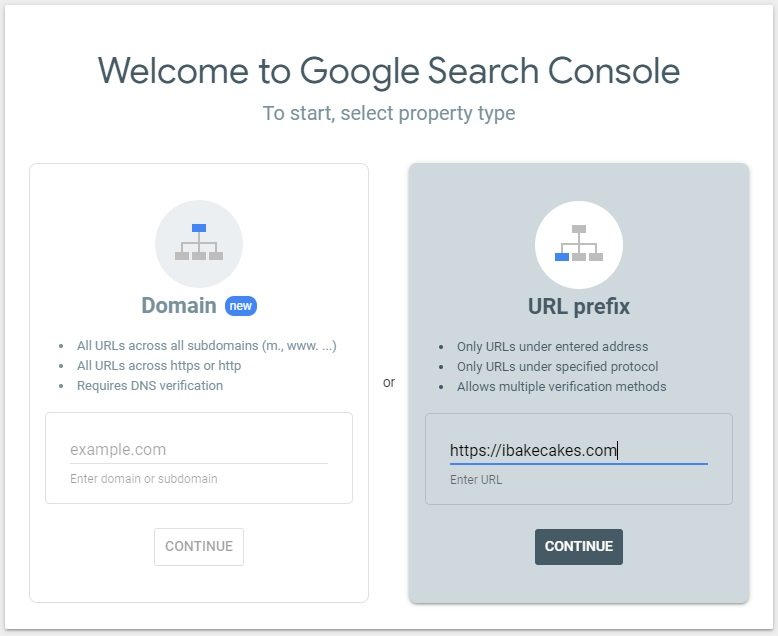
Click on continue and follow the on-screen prompts to verify your web property. Once you have added your property, select the property from the dropdown menu you see on the left:
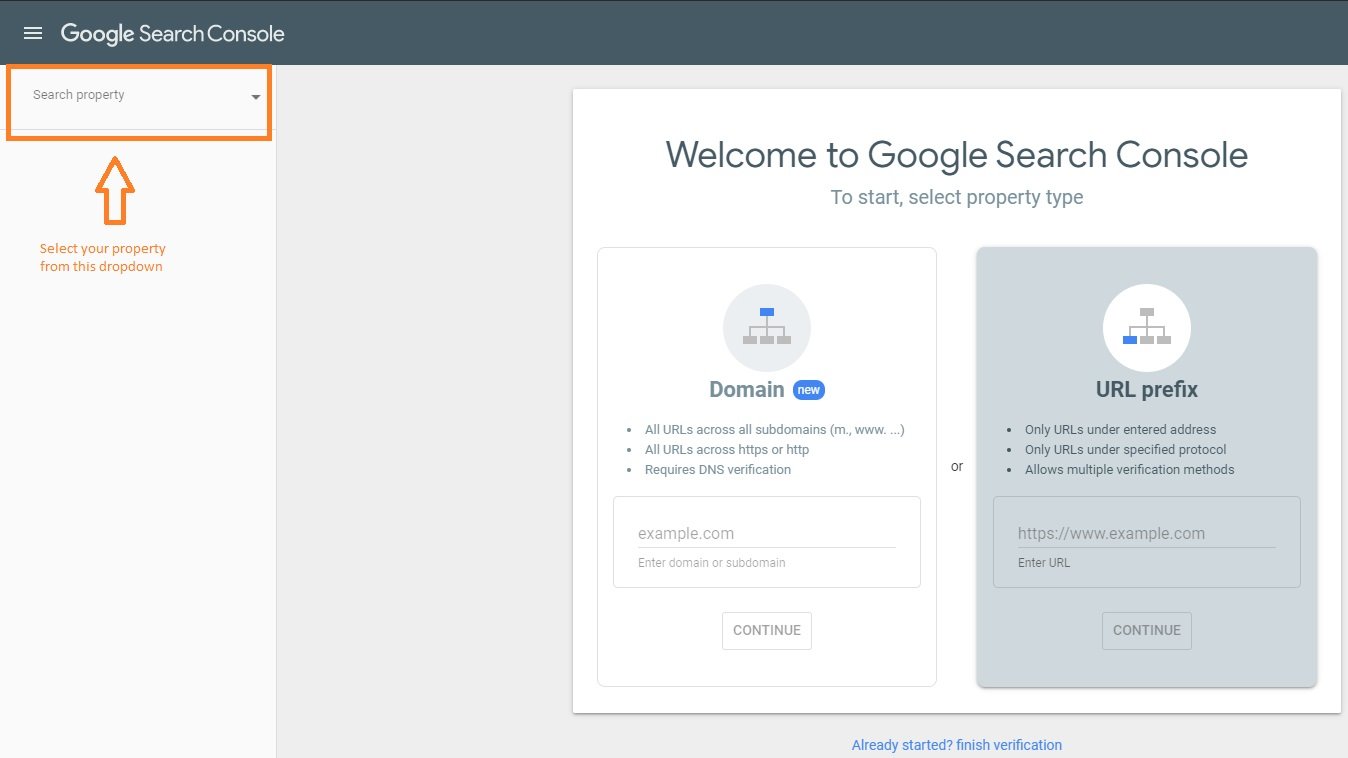
Once you select a property, you will see a menu bar on the left. Locate the option which reads ‘Sitemap.’ Here is how it will look:
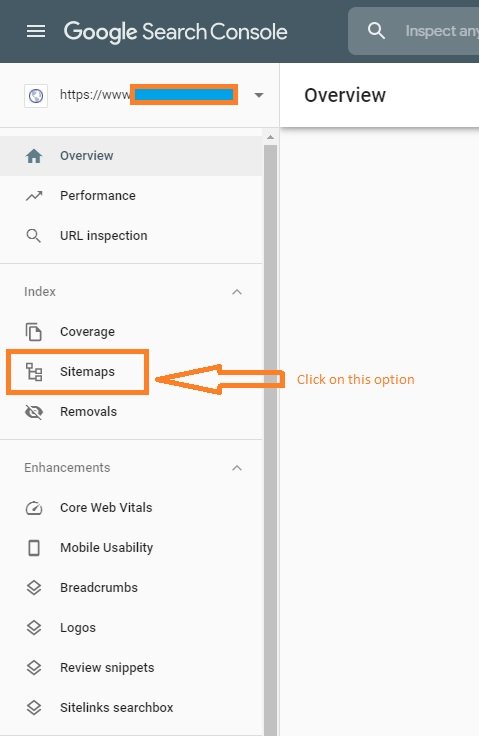
Now submit the sitemap URL you copied from the Yoast plugin and paste it in the required field, and click the submit button.
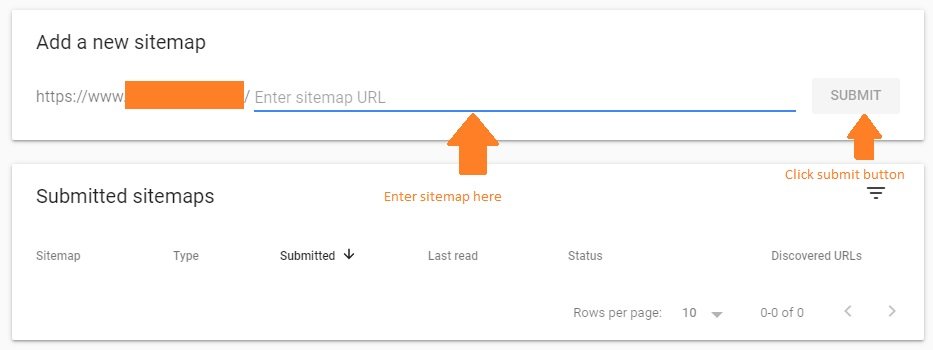
You’re done! You have submitted your sitemap successfully!
You are awesome!
Now, wait for Google to start indexing your site. It can now take days for Google to crawl and index your site.
In the meantime, …
Approach bloggers
Find out similar blogs in your niche. You can use Ubersuggest’s “Content Ideas” segment to identify your competitors.
Visit their website and contact them with a personalized email. Ask them politely to link back to you.
What will you write in the email?
Something like this:
“Hey XYZ,
I read your blog post on “THIS RANDOM TOPIC,” and I must say that it is incredibly well-written. I particularly loved the part where you talked about “THIS THING.” You have an excellent way of putting across your point. I can learn a thing or two from you.
I will like to tell you that I created a similar detailed blog post on the “ABC topic.” You can find the URL here: https://ibakecakes.com/my-awesome-post/
Will you mind linking back to my blogpost? Here is how it will help your readers:
- Reason 1
- Reason 2
- Reason 3
- Bla, bla, bla…
Feel free to tell me if there is any room for improvement. I will really love to get suggestions from an experienced blogger like you.
Thank you in advance.
Best Regards,
LMNOP”
Send these emails to as many bloggers as you can. Make sure you personalize your emails with their names. It is a MUST!
Most of them will not even reply. Even if one of those emails click and at least one established blog links back to your blog, it is great!
Organic traffic will start flowing because when a big website or blog links back to you, Google sees it as a great sign!
You have to keep doing this regularly for every great post you write. Chances are that at least 1 out of every 100 emails you send will get a positive response.
Trust me, this is THE MOST natural way of link building, and it takes a lot of time and effort. In the end, it is worth the time you spend. After all, you will get organic traffic.
Post on Q&A forums like Quora
Unleash the power of Quora and similar other platforms like Yahoo Answers, Answers.com, etc. These are a different breed of social media platform. Search the forums for the topics that your blog focuses on.
Find recent questions that you can answer on those topics. Write detailed answers and give a link to your blog!
You will start getting some traffic from there. If you are lucky, you will get a lot of traffic.
Don’t forget Reddit
Reddit is an immensely powerful platform that can bring you a lot of traffic. However, unlike in platforms like Quora, Yahoo Answers, etc., you cannot directly advertise your blog.
You have to pose as a general user. Do not tell anyone that you are a blogger. Take time and participate in related subreddits.
When you see a chance, drop in your post URL. Make it look natural. People should think of it as a standard source you are quoting to make a point. Please will then start pouring in!
YouTube is a good way
Create a YouTube channel. Make videos and post them. Ask people directly to visit your blog at the end or at the beginning of the script.
If you don’t want to add your blog in the script, add it to the description field. YouTube channel will take some time to grow.
Another way is to find similar channels and comment on them. If the channel owners moderate and remove your blog URL, that’s bad luck. If they don’t moderate your comment and allow adding your URL, you are in luck! You can expect a few visitors from there as well.
Republish your content on Medium.com
You can go ahead and republish your post on Medium.com. It is a platform that is free to use. Create an account and republish it. If you can find any Medium publication in the niche you are working, contact them and ask them to publish your content.
Don’t worry about duplicate content. All that has to be done is to clearly mention that it was reposted using explicit permission of the original content creator!
Forums and message boards
Try to find popular forums and message boards in your niche. They are just similar to Reddit but on a much small scale. Even they can send some traffic. Do follow the rules of those forums. If you don’t follow the rules, you will get yourself banned.
Avoid direct advertisement as with Reddit. Do it subtly! Pose as a regular user and place your link as a reference.
Finding a relevant forum can be difficult, but you can always try searching on Google with search terms like ‘your niche + online groups,’ or ‘your niche + forum.’ If you are lucky, you will find a few.
Facebook groups
Go to Facebook and see if you can find groups in that niche. Join those groups. You will have a ready audience. Participate in conversations for a few days before asking others to check out your excellent blog!
Email newsletters
Keep a subscription option on your website. Capture email IDs from there. People who register to your blog are the ones who want to get regular updates. Send emails to them with a summary of your new blog posts whenever you publish them.
Email newsletters help to retain readers and convert them into loyal customers who may eventually buy products if you ever start selling something!
Remember: Until Google indexes your content and thinks that it adds value to eventually start showing your content in search results, you will most likely need some direct traffic. That can come through effective marketing. It will take time, but do it anyway.
Chapter 6: Monetizing Your Content
This is the last chapter. This is where I will tell you how to monetize your content. If you are blogging, one of the motives is to earn money. You have to monetize your content. How do you do that?
There are several methods. Read on!
Google AdSense
This is by far the easiest method, but the least rewarding. Unless you have a sizeable number of visitors, seeing some revenue rolling in will be a dream!
Assuming that you have visitors, you can go ahead and sign up with Google AdSense. They need to approve your blog for advertisement.
You need to fulfill specific criteria, which ironically, Google never mentions clearly. Their modus operandi remains as shady as ever.
Some people with just 2 or 3 blog posts get their blogs accepted by AdSense. Some with 50+ posts fail to get approval.
No one knows what happens behind the curtains. From various forums, here is a rough idea:
- Keep at least 2 blog posts in every category.
- Ensure that you are not writing on restricted or banned categories. Check out the rules with Google AdSense policies.
- Use long-form content. [I already said – blog posts of around 2000 words each and cornerstone or pillar content of at least 15000 words each]
- Keep your blog posts well-structured.
- Ensure that your blog is not too-slow to load.
- Don’t pay Google AdWords (now officially known as Google Ads) to advertise your blog. AdWords and AdSense do not go hand-in-hand.
- DO NOT USE A STICKY SIDEBAR! Google doesn’t approve of that!
If you follow these rules, there are 80-90% chances that they will accept your blog. However, if they don’t accept your blog, they will not say any reason clearly. You have to figure it out on your own.
If Google accepts you, it is excellent! Now, go to Google AdSense dashboard, follow the instructions, grab the ad codes, and place them on your blog. Voila! You have monetized your content. The more visitors you get, the more you earn.
There are many other ad networks like Yahoo-Bing contextual ad, Sulvo, etc. But I will suggest not to go for Yahoo-Bing ads. They are horrible! Thousands of people complain about not getting paid.
Platforms like Sulvo, Mediavine, etc. have high traffic requirements. Mediavine, for example, will need your blog to have at least 25,000 monthly page views with 80% of the traffic from tier I countries. If you satisfy these conditions, they will accept you.
For a new blog, that amount of traffic is like a far-fetched utopian dream. It takes months to get such traffic.
Sulvo is a very high paying ad network that promises 500% growth over AdSense earnings! Well, they do achieve what they say. But the catch is that if you are to get into Sulvo, you need minimum traffic of 500,000 a month.
Are you going there? Not today, I guess!
Affiliate links
You can earn a lot from affiliate marketing. If your niche allows affiliate marketing, go for it! Some affiliates earn millions every year.
You have to sign up as affiliates with different companies, add their links in your content, and wait until someone clicks on them and buys something. You will get a commission.
Sounds easy?
Wait! Don’t get too excited right now! Affiliate marketing is not easy. You have to actively promote their content in your blog posts. You may have to write full-scale reviews of their products, telling your readers why they are great.
Generating affiliate income can take some time. However, when you do that correctly, you can become rich!
Becoming an Amazon affiliate is a good start. You can become affiliates on other networks like Rakuten, ShareASale, Commission Junction, Flex Offers, etc.
e-Books
Repackage your content, add some new information, and sell them as e-books. For instance, if you are in the cake baking niche, you can create an e-book on say, “50 Awesome and Quick Recipes for Beginners.” You may also create something like “50 Fancy Wedding Cake Designs Every Couple Wants.”
Create a detailed e-book on this topic, complete with quality images, suggestions, tips, and tricks, etc.
People who care will buy. It might take some time, but it is worth the wait. E-Books can create a passive income source.
It will take time to create an e-book, but once it is ready, you can keep earning.
Sponsored posts
This can take years to happen. Your blog needs to have a good reputation. Companies will then approach you to sponsor their content.
You have to be very careful here.
Google doesn’t like paid links. If Google search crawlers see blatant advertisement links in the middle of your content without any disclosure (like disclaimer for affiliate marketing, or a sponsored tag on the link of the sponsor), your website can get a penalty.
It will be a dreadful situation if Google penalizes you. You should be “VERY CAREFUL.”
If you are accepting sponsored posts, you need to make sure that the content naturally weaves into your blog’s publishing style. Any like you put up in such blog posts should be very natural, and it should have a ‘sponsored’ tag.
If sponsored posts click, a single post can earn you in hundreds or thousands of dollars.
Online courses
Start creating online courses if your blogging niche allows that. For example, the “cake baking” niche can have an online course.
You don’t have to have an online classroom or anything like that. You can create courses as e-books and sell them in a series.
If you want something online, you can opt for services like teachable.com.
Podcasts
If your niche allows, you can get into podcasts! Once you launch podcasts, you can use the traffic data, and the early listener stats to strike sponsorship deals with companies that want the type of traffic and listeners you have.
Do make sure that you start contacting influential people in your industry and start interviewing them. Your podcasts should have important takeaway points!
Conclusion
Blogging is not easy! It can become your fulltime job. You need to have the tenacity and the willingness to learn. Trust me, this 15000-word long blog post has not even scratched the tip of the iceberg. There is so much more to blogging that you will keep learning over the years.
Patience is the key! If you hold the key, you can unlock the door to success! Get started today!